Category: Blog

  • BreakGlass

    BreakGlass

    The Highly Configurable Temporary GCP Privilege Escalation Tool

    What is BreakGlass?

    BreakGlass is a tool that allows developers to temporarily escalate their own GCP permissions at any time. This is like the sudo command for GCP permissions. Developers will be able to fix things at 3 AM without waking up the teams RP.

    UI UI2 Bot

    How it works

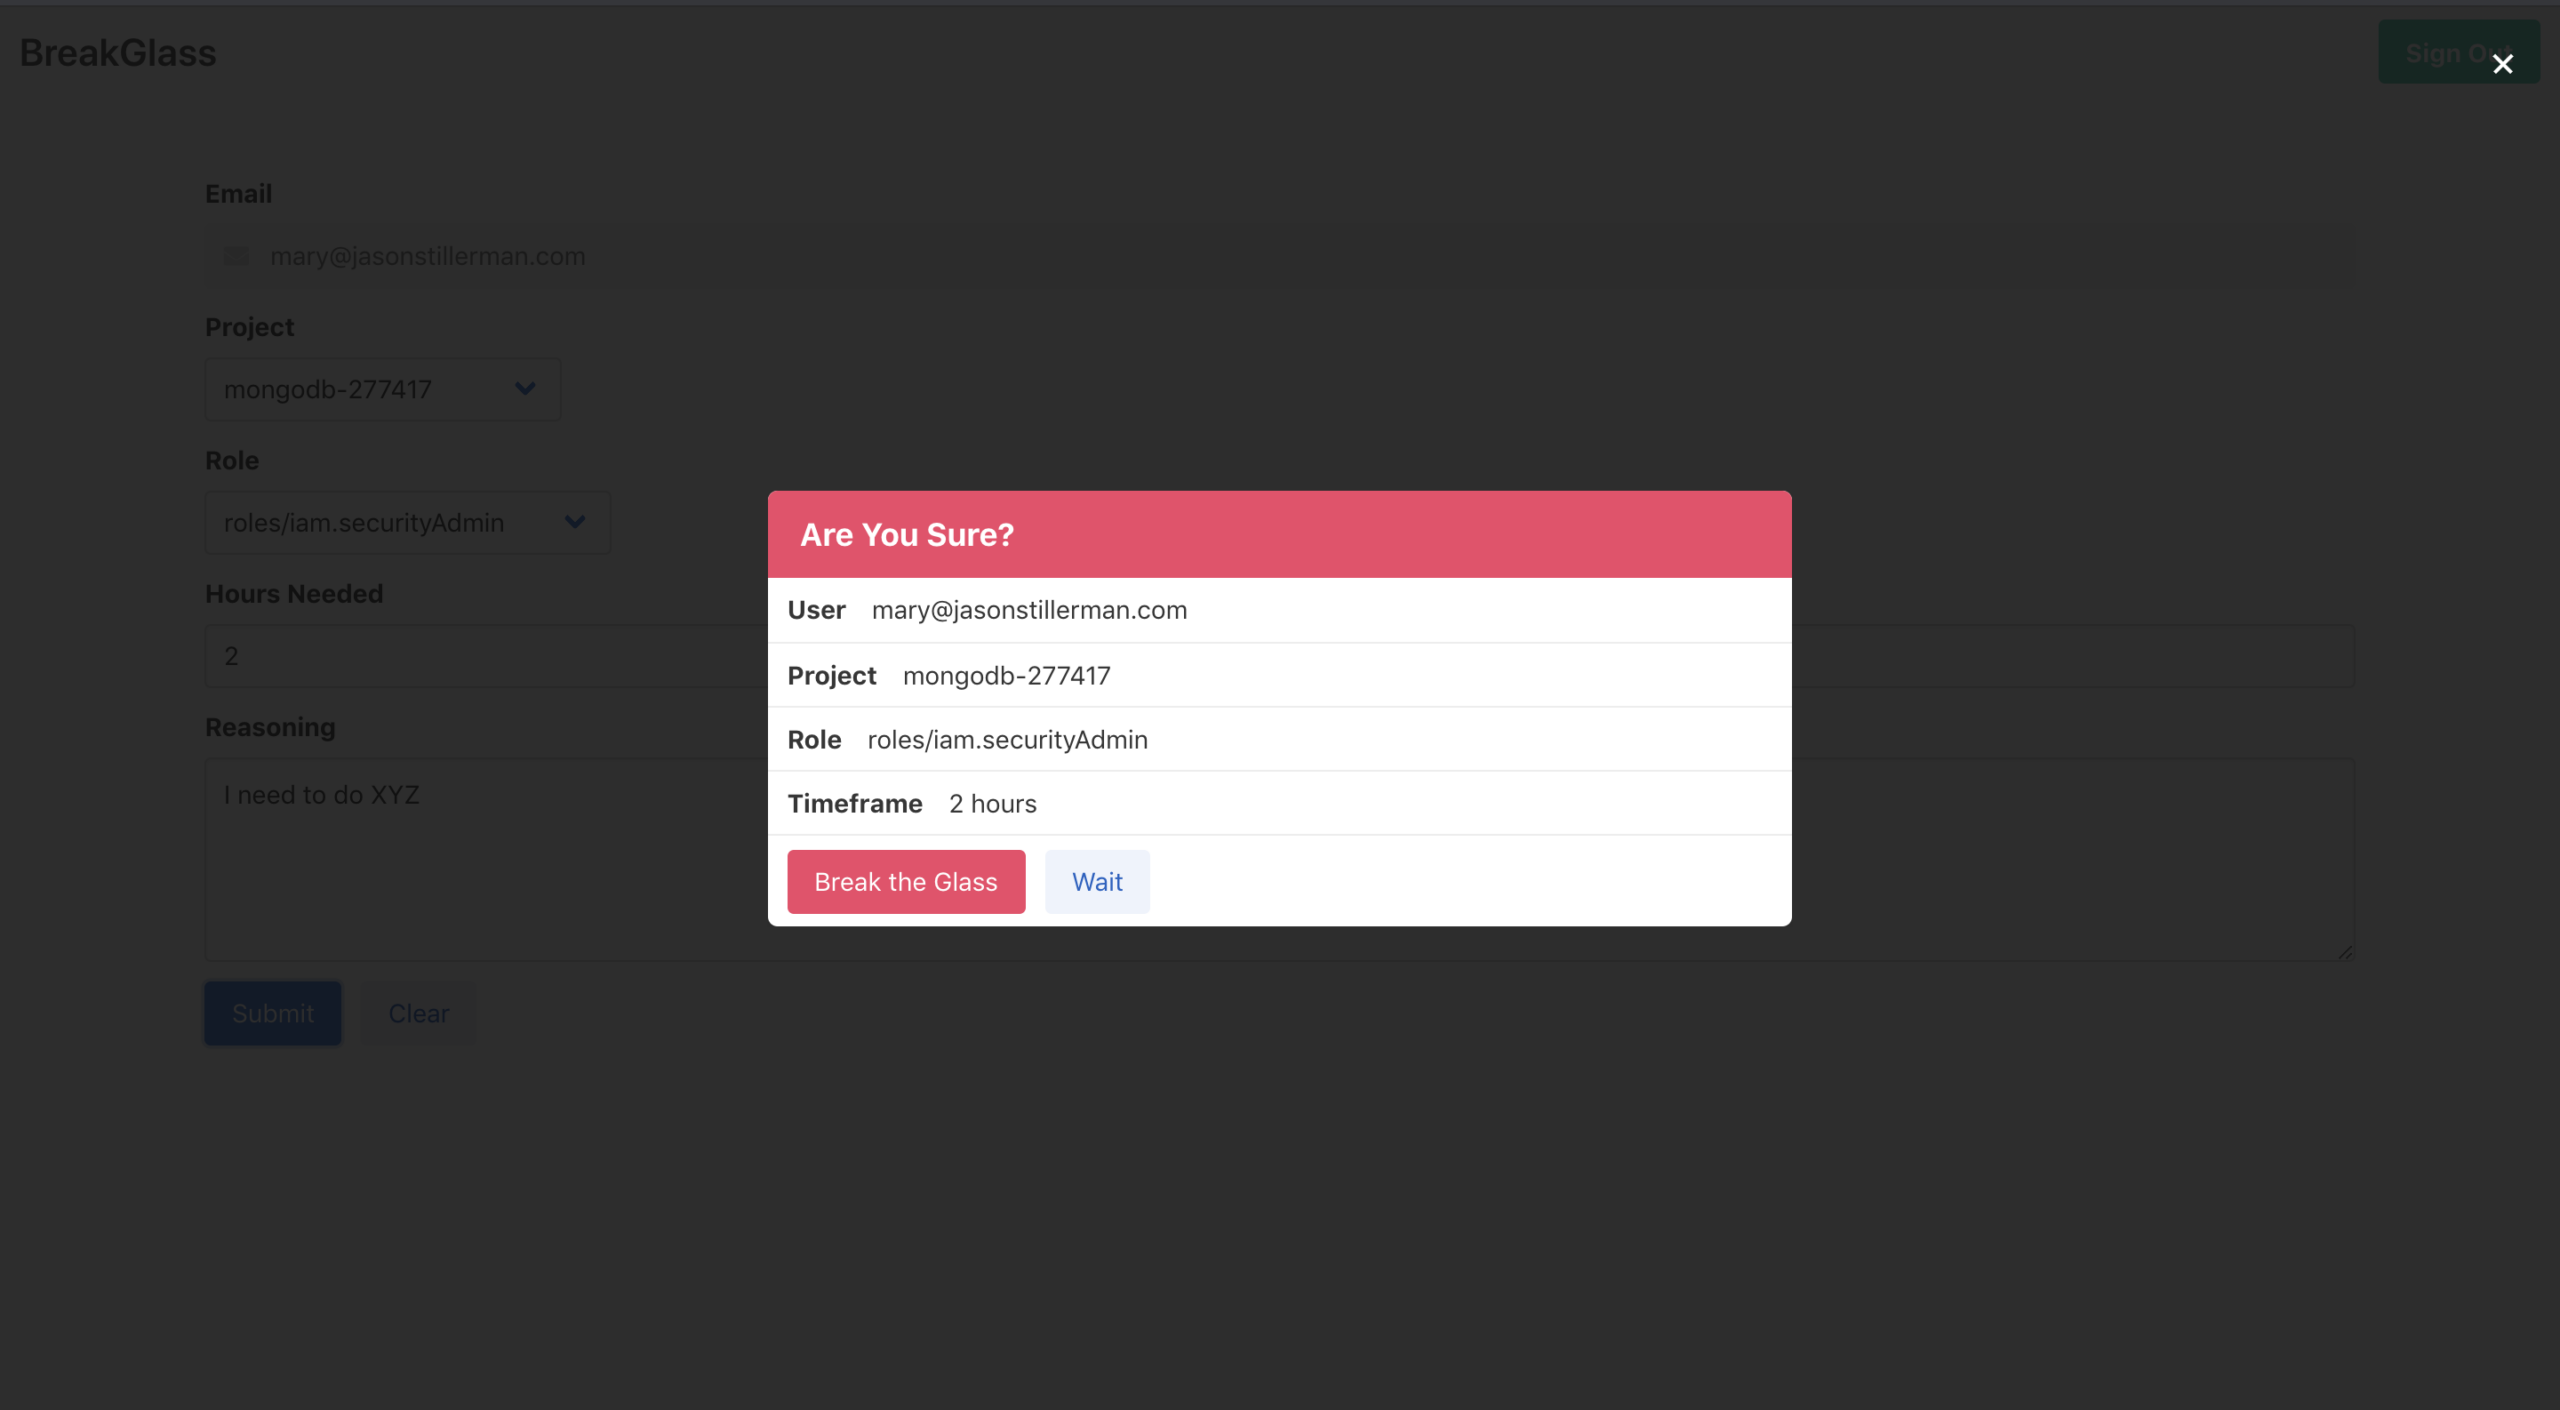
    1. Sign into the app with your GCP credentials
    2. Select a project
    3. Select the permissions you need
    4. Select a timeframe
    5. Provide your reasoning for breaking the glass
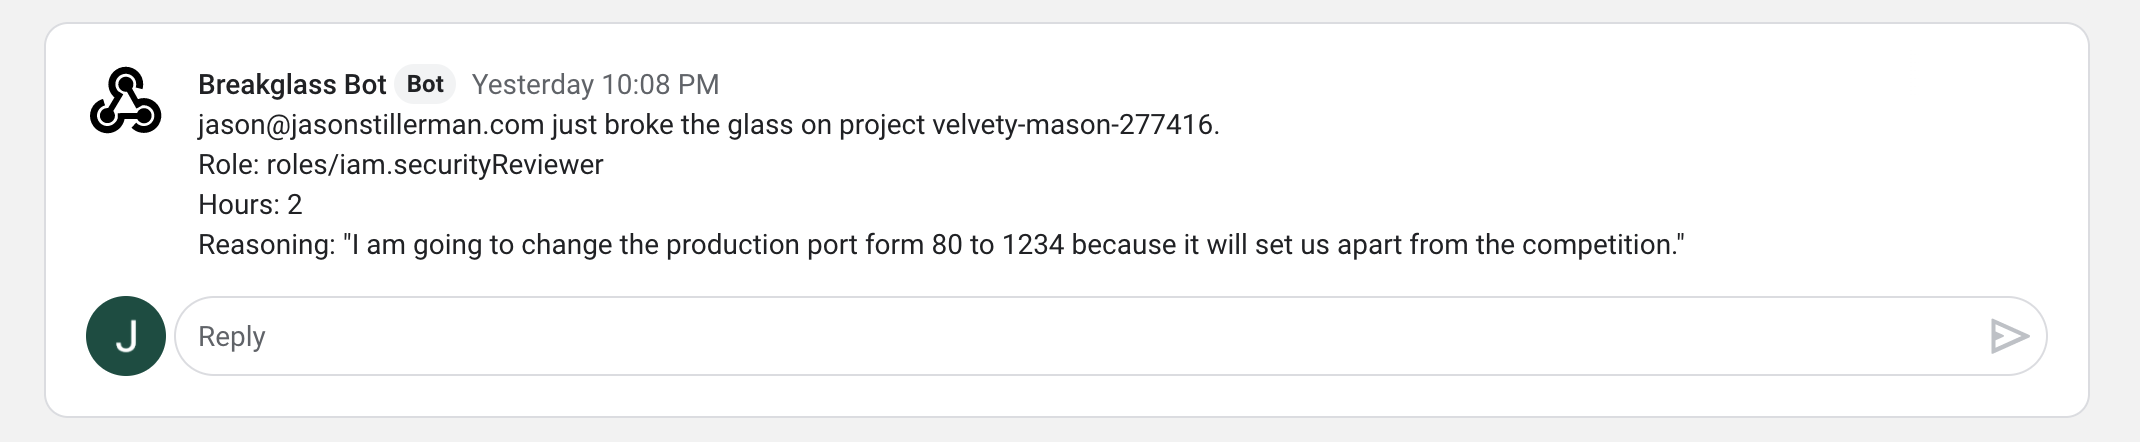
    6. Your permissions will be provided and the event will be logged

    Getting Started

    1. $ git clone https://github.com/Stillerman/BreakGlass

    2. Create a new GCP project that will house the BreakGlass server. gcloud projects create breakglass-{UniqueID} --name="BreakGlass"

      Make sure unique ID is a company-specific identifier because the projectID must be unique across all projects on google cloud.

      Set that project to default with gcloud config set project breakglass-{UniqueId}

    3. Create a service account

      gcloud iam service-accounts create sa-breakglass \
      --description="BreakGlass service account" \
      --display-name="sa-breakglass-disp"
      --project=breakglass-{UniqueID from above}

      You will now be able to see the account with

      gcloud iam service-accounts list
      

      It will be something like sa-breakglass@breakglass-{uniqueID}.iam.gserviceaccount.com Download the key.json file with the following command (be sure you are in the root of the directory you cloned)

      gcloud iam service-accounts keys create ./key.json \
          --iam-account {The service account you created above}
      

      Sign in by running the following

      gcloud auth activate-service-account {service account} --key-file=key.json
      
    4. Grant Permissions

      Enable the Cloud Resource Manager API Here Note be sure that this is for the project Breakglass!

      Next, grant sa-breakglass folder admin in all of the folders that you would like users to have the change to escalate in. Breakglass will only be able to see and update projects where it is the folder admin.

      After permissions are configured, run

      gcloud projects list
      

      and make sure you can see the projects you want breakglass to have access to. Note It might take 3-5 minutes for the permissions to update and the projects to be visible.

    5. Add OAuth to breakglass project

      Go to the cloud console, select the breakglass project and then navigate to APIs & Services -> Credentials. Click “Create Credentials” -> Oauth Client ID -> Configure Consent Screen -> Internal then provide a display name (probably breakglass) -> Save

      Now go back to credentials -> Create Credentials -> OAuth Client Id -> Application type: Web Application

      Here, you name the key (name doesn’t matter) and you also add “Authorized JavaScript Origins”. Add just “http://localhost:8080” for now, we will come back to this later.

      Click create and copy the client ID for later. You won’t be needed the secret.

    6. Configure Breakglass

      Copy K8s/breakglass-configmap.yaml.example to K8s/breakglass-configmap.yaml and configure it to your needs. Read about possible configurations here.

      Note you will need the OAuth Client Id from the previous step.

    7. Build the project

      Build the docker image in the minikube context with

      yarn k8s
      

      Configure Kubernetes Project with

      minkube start
      kubectl apply -f K8s
      

      Now the project will be running, but you have not whitelisted the port on the OAuth, so it will not work as is. Ensure everything is working properly by forwarding the port to the pod

      kubectl port-forward {Naem od pod that was created} 8080:8080
      

      Now navigate to http://localhost:8080

    8. Done.

    Visit original content creator repository
  • aioodbc

    aioodbc

    GitHub Actions status for master branch Chat on Gitter

    aioodbc is a Python 3.7+ module that makes it possible to access ODBC databases with asyncio. It relies on the awesome pyodbc library and preserves the same look and feel. Internally aioodbc employs threads to avoid blocking the event loop, threads are not that as bad as you think!. Other drivers like motor use the same approach.

    aioodbc is fully compatible and tested with uvloop. Take a look at the test suite, all tests are executed with both the default event loop and uvloop.

    Basic Example

    aioodbc is based on pyodbc and provides the same api, you just need to use yield from conn.f() or await conn.f() instead of conn.f()

    Properties are unchanged, so conn.prop is correct as well as conn.prop = val.

    import asyncio
    
    import aioodbc
    
    
    async def test_example():
        dsn = "Driver=SQLite;Database=sqlite.db"
        conn = await aioodbc.connect(dsn=dsn)
    
        cur = await conn.cursor()
        await cur.execute("SELECT 42 AS age;")
        rows = await cur.fetchall()
        print(rows)
        print(rows[0])
        print(rows[0].age)
        await cur.close()
        await conn.close()
    
    
    asyncio.run(test_example())

    Connection Pool

    Connection pooling is ported from aiopg and relies on PEP492 features:

    import asyncio
    
    import aioodbc
    
    
    async def test_pool():
        dsn = "Driver=SQLite3;Database=sqlite.db"
        pool = await aioodbc.create_pool(dsn=dsn)
    
        async with pool.acquire() as conn:
            cur = await conn.cursor()
            await cur.execute("SELECT 42;")
            r = await cur.fetchall()
            print(r)
            await cur.close()
            await conn.close()
        pool.close()
        await pool.wait_closed()
    
    
    asyncio.run(test_pool())

    Context Managers

    Pool, Connection and Cursor objects support the context management protocol:

    import asyncio
    
    import aioodbc
    
    
    async def test_example():
        dsn = "Driver=SQLite;Database=sqlite.db"
    
        async with aioodbc.create_pool(dsn=dsn) as pool:
            async with pool.acquire() as conn:
                async with conn.cursor() as cur:
                    await cur.execute("SELECT 42 AS age;")
                    val = await cur.fetchone()
                    print(val)
                    print(val.age)
    
    
    asyncio.run(test_example())

    Installation

    In a linux environment pyodbc (hence aioodbc) requires the unixODBC library. You can install it using your package manager, for example:

    $ sudo apt-get install unixodbc
    $ sudo apt-get install unixodbc-dev
    

    Then:

    pip install aioodbc
    

    Run tests

    To run tests locally without docker, install unixodbc and sqlite driver:

    $ sudo apt-get install unixodbc
    $ sudo apt-get install libsqliteodbc
    

    Create virtualenv and install package with requirements:

    $ pip install -r requirements-dev.txt
    

    Run tests, lints etc:

    $ make fmt
    $ make lint
    $ make test
    

    Other SQL Drivers

    • aiopg – asyncio client for PostgreSQL
    • aiomysql – asyncio client form MySQL

    Requirements

    Visit original content creator repository
  • FB-BEV

    Forward-Backward View Transformation for Vision-Centric AV Perception

    FB-BEV and FB-OCC are a family of vision-centric 3D object detection and occupancy prediction methods based on forward-backward view transformation.

    News

    • [2023/8/01] FB-BEV was accepted to ICCV 2023.
    • 🏆 [2023/6/16] FB-OCC wins both Outstanding Champion and Innovation Award in Autonomous Driving Challenge in conjunction with CVPR 2023 End-to-End Autonomous Driving Workshop and Vision-Centric Autonomous Driving Workshop.

    Getting Started

    Model Zoo

    Backbone Method Lr Schd IoU Config Download
    R50 FB-OCC 20ep 39.1 config model

    • More model weights will be released later.

    License

    Copyright © 2022 – 2023, NVIDIA Corporation. All rights reserved.

    This work is made available under the Nvidia Source Code License-NC. Click here to view a copy of this license.

    The pre-trained models are shared under CC-BY-NC-SA-4.0. If you remix, transform, or build upon the material, you must distribute your contributions under the same license as the original.

    For business inquiries, please visit our website and submit the form: NVIDIA Research Licensing.

    Citation

    If this work is helpful for your research, please consider citing:

    @inproceedings{li2023fbbev,
      title={{FB-BEV}: {BEV} Representation from Forward-Backward View Transformations},
      author={Li, Zhiqi and Yu, Zhiding and Wang, Wenhai and Anandkumar, Anima and Lu, Tong and Alvarez, Jose M},
      booktitle={IEEE/CVF International Conference on Computer Vision (ICCV)},
      year={2023}
    }
    

    @article{li2023fbocc,
      title={{FB-OCC}: {3D} Occupancy Prediction based on Forward-Backward View Transformation},
      author={Li, Zhiqi and Yu, Zhiding and Austin, David and Fang, Mingsheng and Lan, Shiyi and Kautz, Jan and Alvarez, Jose M},
      journal={arXiv:2307.01492},
      year={2023}
    }
    

    Acknowledgement

    Many thanks to these excellent open source projects:

    Visit original content creator repository