fastRhockey is an R
Package that is designed to pull play-by-play (and boxscore) data from
the newest version of the Professional Women’s Hockey League
website. In the past, there have been a few
scrapers for the PHF (formerly the NWHL), but they have all been
deprecated since the formation of the new PWHL league changed websites.
With the first season of the league kicking off on January 1st, and
games being broadcast on ESPN+, this package was created to allow access
to play-by-play data to continue pushing women’s hockey analytics
forward.
In Spring of 2021, the Big Data
Cup
and the data they made
available
revolutionized what we were able to thanks to the detailed play-by-play
data for the season and the x/y location data. That wave continued with
the inaugural WHKYHAC conference in July
that produced some amazing conversations and projects in the women’s
hockey space.
In the past, the lack of data and poor access to data have been the
biggest barrier to entry in women’s hockey analytics, a barrier that
this package intends to alleviate.
Installation
You can install the CRAN version of
fastRhockey
with:
install.packages("fastRhockey")
You can install the released version of
fastRhockey
from GitHub with:
# You can install using the pacman package using the following code:if (!requireNamespace('pacman', quietly=TRUE)){
install.packages('pacman')
}
pacman::p_load_current_gh("sportsdataverse/fastRhockey", dependencies=TRUE, update=TRUE)
If you would prefer the devtools installation:
if (!requireNamespace('devtools', quietly=TRUE)){
install.packages('devtools')
}
devtools::install_github(repo="sportsdataverse/fastRhockey")
Follow the SportsDataverse (@sportsdataverse) on Twitter and star this repo
Our Authors
Ben Howell (@BenHowell71)
Saiem Gilani (@saiemgilani)
Our Contributors (they’re awesome)
Alyssa Longmuir (@alyssastweeting)
Tan Ho (@_TanHo)
Citations
To cite the
fastRhockey R package
in publications, use:
BibTex Citation
@misc{howell_gilani_fastRhockey_2021,
  author = {Ben Howell and Saiem Gilani},
  title = {fastRhockey: The SportsDataverse's R Package for Hockey Data.},
  url = {https://fastRhockey.sportsdataverse.org/},
  year = {2021}
}
This is a REST API project built to perform MSISDN (Mobile Station International Subscriber Directory Number) lookups from 20 Redis sets. Each set contains a massive amount of data (approximately 20 million records). The project is developed using Golang, the Fiber framework, and Docker for containerization.
Containerized using Docker for easy deployment and scaling.
Prerequisites
Before you get started, ensure you have the following dependencies installed:
Golang
Docker
Installation
Clone this repository:
git clone https://github.com/abdur-rakib/msisdn-lookup.git
cd msisdn-lookup
Set up your Redis instances with the 20 data sets containing the MSISDN records.
Run the project using docker compose:
docker compose up -d --build
Usage
Once the API is running, you can make HTTP requests to perform MSISDN lookups. Detailed API documentation can be found in the API Endpoints section below.
API Endpoints
GET /customer-segments/?msisdn={msisdn}: Lookup the MSISDN in the Redis sets.
Replace {msisdn} with the MSISDN you want to look up.
This repository has been archived and is no longer actively maintained. The code remains available for reference purposes, but no further updates, bug fixes, or pull requests will be accepted.
Feel free to fork this project if you’d like to continue development.
🙏 Thank You to All Contributors
A huge thank you to everyone who contributed ideas, code and reviews to this project. Your time, effort, and support are greatly appreciated and have been essential to the evolution of this repository.
A privacy-first, cross-platform, open-source desktop AI assistant for all
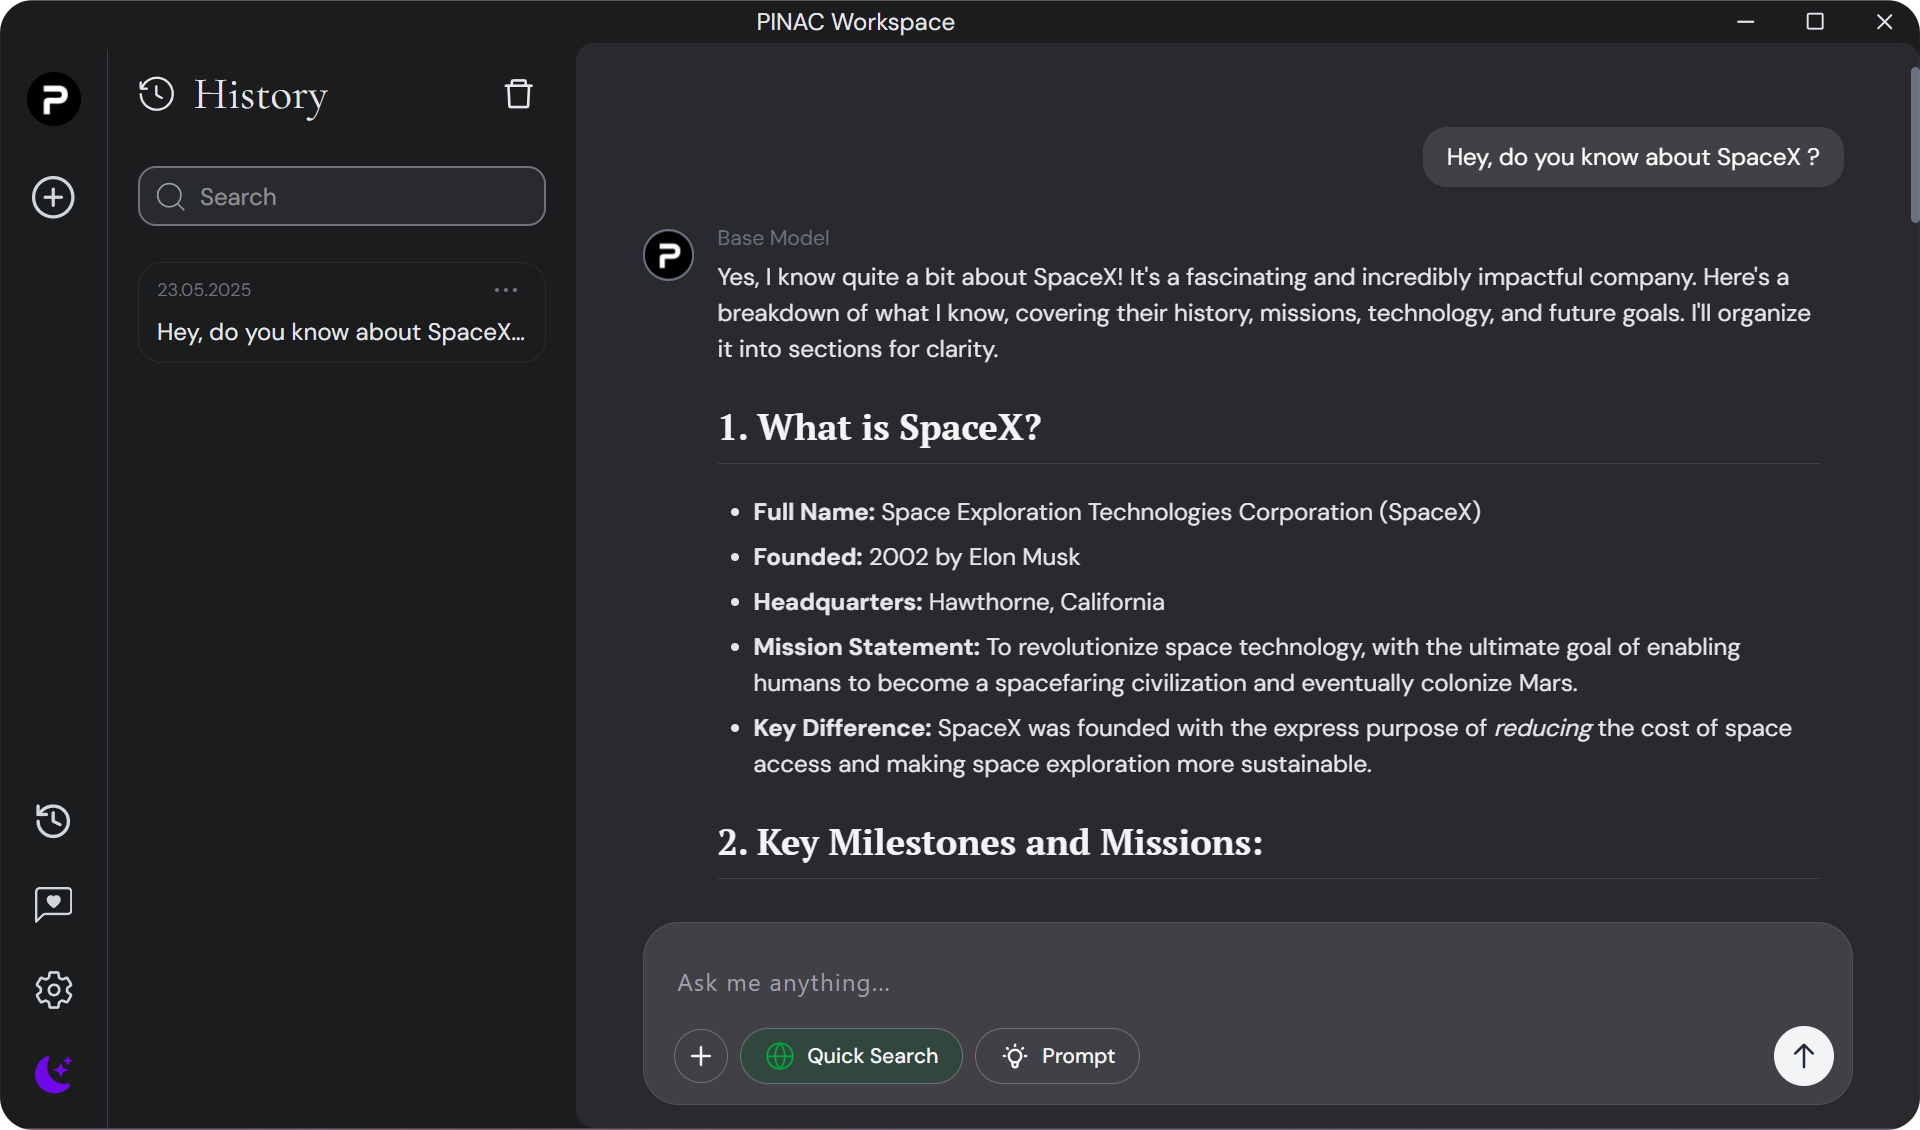
PINAC Workspace
PINAC Workspace is a modern-looking privacy-first AI chat for desktops, seamlessly blending Electron-React for a modern user experience with powerfully Python backend. Unlock the full potential of AI with unparalleled simplicity and user-friendliness, while enjoying ultimate freedom and privacy.
✨ Features
Total Freedom: Choose between local (Ollama) and cloud (Pinac-Cloud) AI models to suit your workflow and privacy needs.
Privacy by Design: No personal data is ever shared or stored on our servers. All features work fully offline, ensuring your data stays on your device.
Local RAG Integration: Attach documents directly in chat and leverage a lightweight, local Retrieval-Augmented Generation (RAG) model. Optionally, plug in your own RAG model for advanced use cases.
Real-Time Web Search: Instantly access up-to-date information from the web to answer questions and enhance conversations.
Secure Authentication: Sign in and out securely with Firebase Authentication, protecting your identity and access.
Local Chat History: All conversations are stored locally for your privacy and convenience. Easily revisit and refine past chats.
Modern Desktop Experience: Enjoy a sleek, responsive UI built with Electron and React, powered by a robust Python backend.
🛹 UI-Design
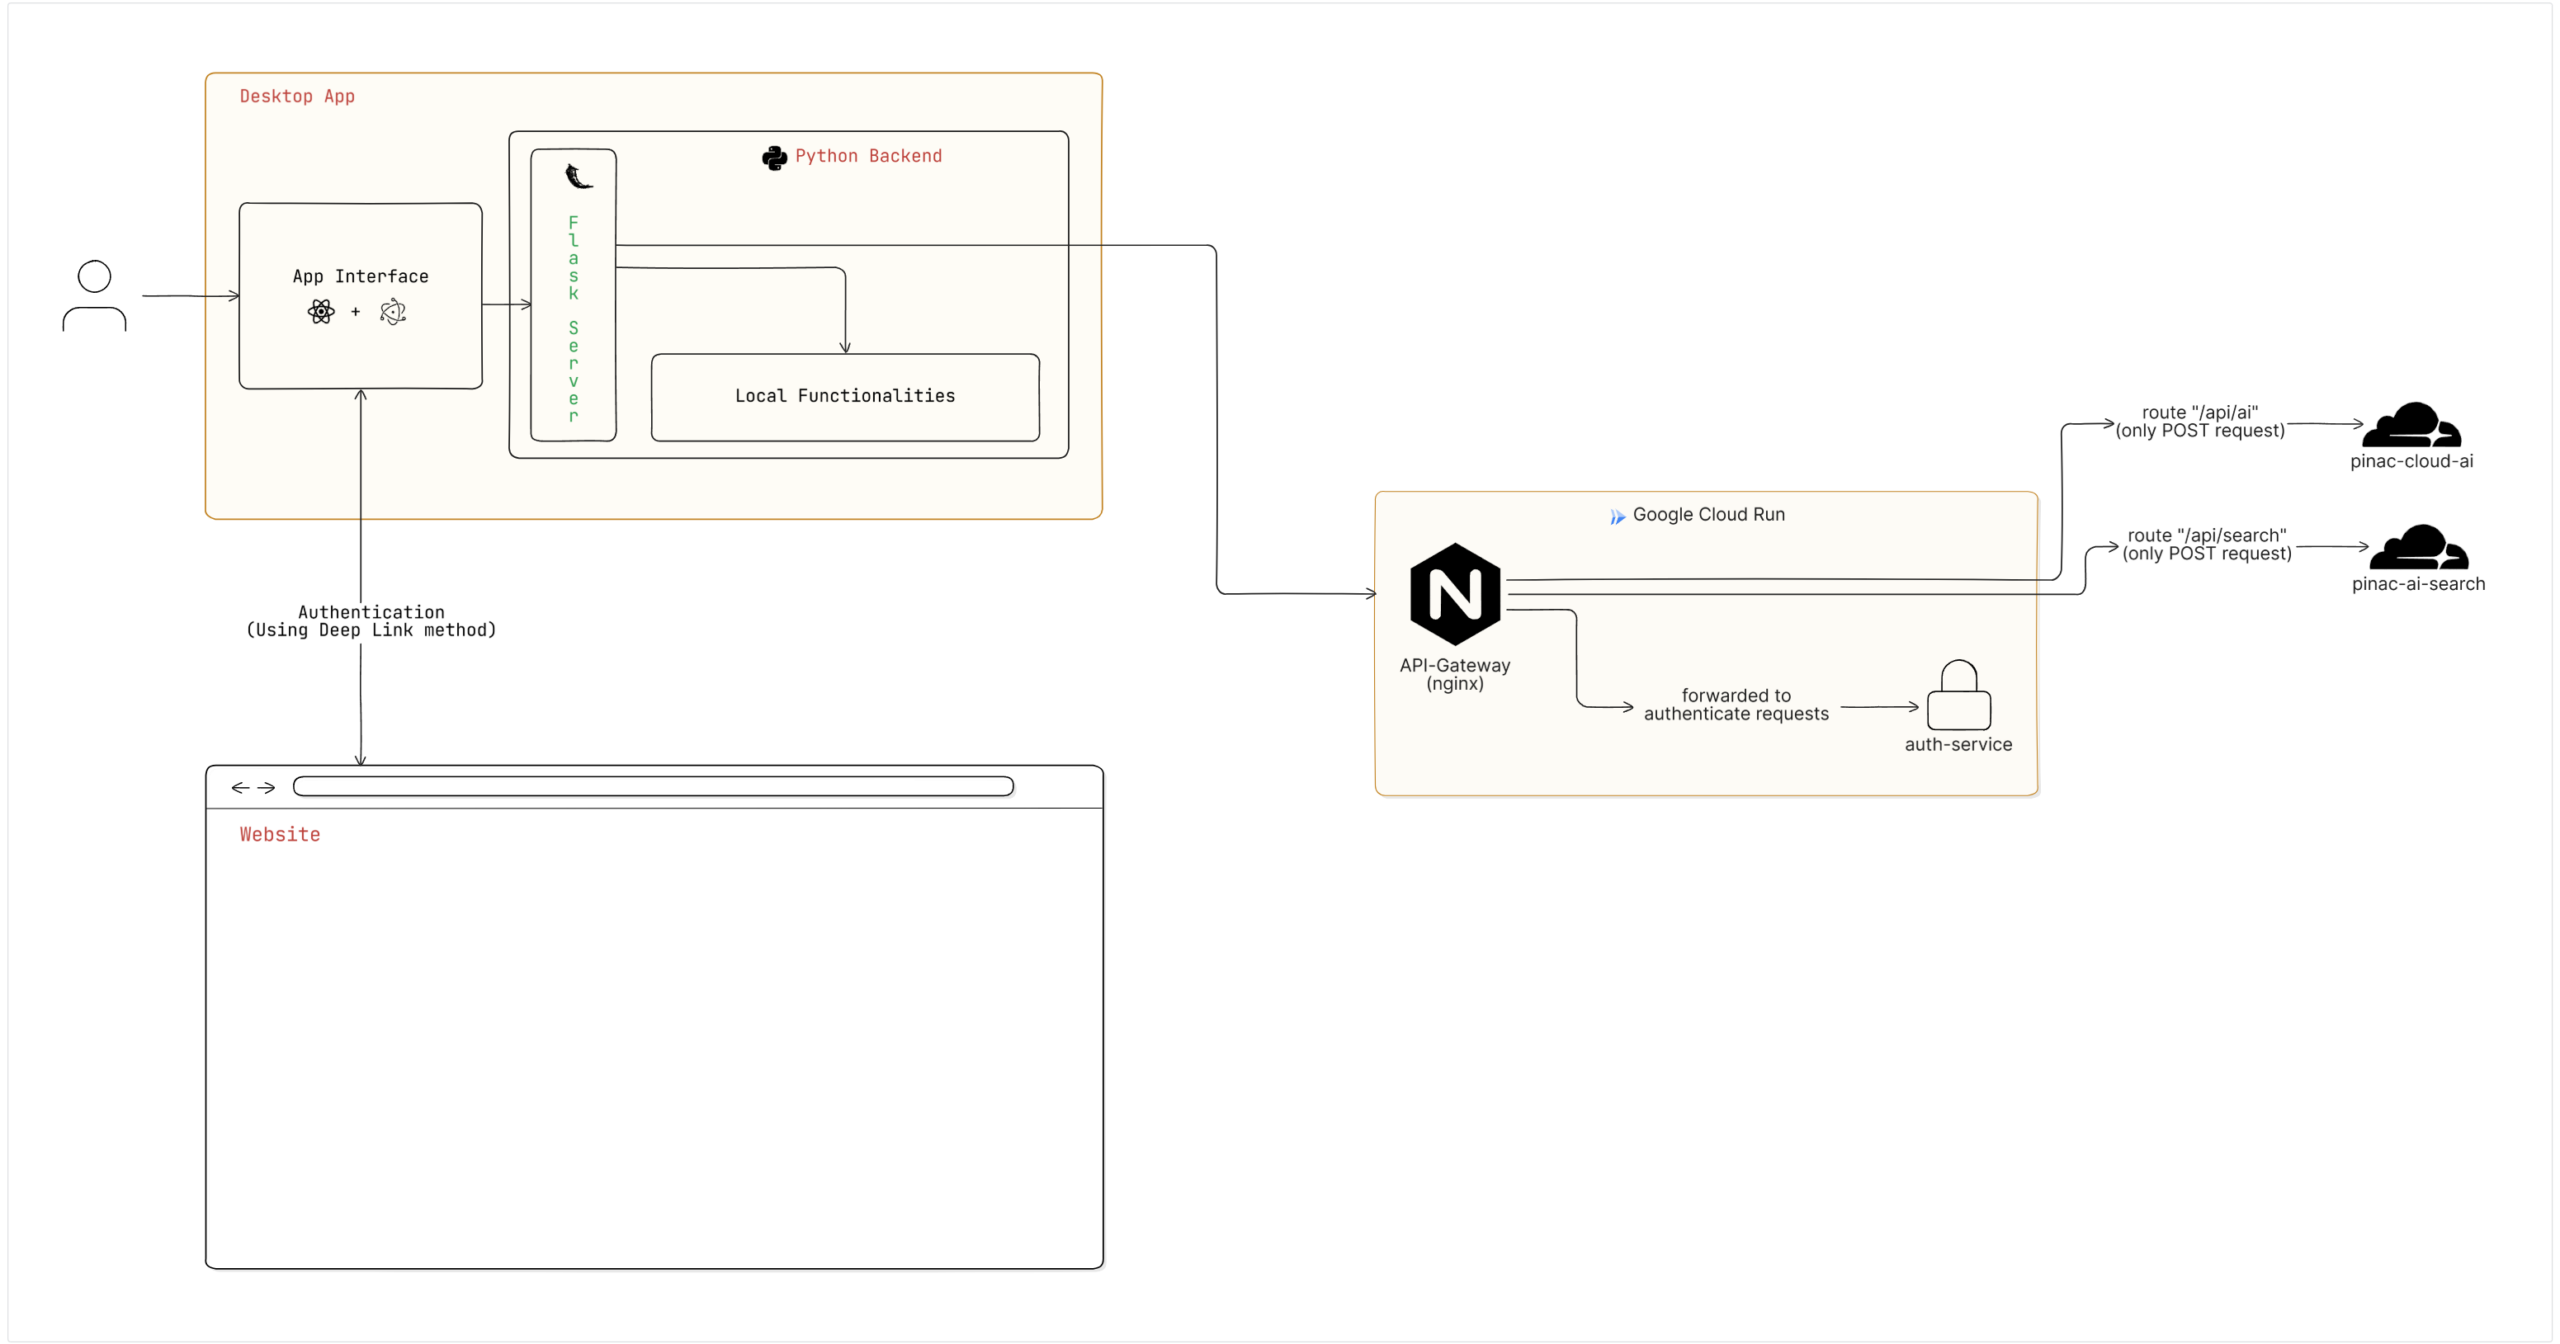
🗼 System Design
Note
You can find the microservice code (ready to be deployed to the cloud and used as required services) in the following repositories:
PSwag – code-first REST API and Swagger generation for PHP
Easily create a REST API for your PHP functions – same way as you might know from ABP framework’s application services – without the need to juggle with Requests and Responses anymore. All you need to do is providing proper type definitions for method parameters and return types of your endpoint functions.
While many api-first approaches exist that generate server-side code from a predefined OpenAPI specification, or derive this from a proprietary documentation as extension to code, the project PSwag aims at code-first and auto generation (on the fly) of swagger endpoints by relying on code directly that just needs to be properly typed.
PSwag is an extension to Slim and you can use all functionalities of it. In addition to this, PSwag brings you following benefits:
It automatically maps your custom method signatures to REST API endpoints
It provides an always-up-to-date OpenAPI 3.0 specification of your REST API endpoints
It embeds Swagger UI
It supports GET, PUT, DELETE, PATCH, POST
It supports PHP inbuilt types, enums, custom classes, arrays (of both, inbuilt and custom types), nullables
Code annotations are directly used to show as descriptions in Swagger
When calling a REST endpoint, the request is automatically transformed and mapped PHP method is invoked
The return result of PHP method is automatically transformed to REST result and returned to endpoint caller
Authentication is supported for BasicAuth, Bearer and API Keys
Installation
It’s recommended that you use Composer to install PSwag.
$ composer require pswag/pswag
This will install PSwag and all required dependencies.
Basic example: Petstore
Let’s create an example for a Petstore. To specify an endpoint for our REST API, first create a method getPetById that takes an id and returns an object of type Pet.
class PetApplicationService
{
/** * Find pet by ID * @param int $petId ID of pet to return * @return Pet Returns a single pet */publicfunctiongetPetById(int$petId): Pet {
returnnewPet(10, 'doggie', newCategory(1, 'Dog'), ['photo1.jpg'], [newTag(0, 'cute')], 'available');
}
}
Note that all parameters and also return type need to be properly typed in order to enable PSwag to derive the OpenAPI specification. Method comments can be used to provide descriptions or more specific datatypes.
When using custom types, e.g. classes Pet, Category and Tag, all of their properties need to be typed as well. Let’s have a look at class Pet:
class Pet
{
public ?int$id;
publicstring$name;
public ?Category$category;
/** @var string[] $photoUrls */publicarray$photoUrls;
/** @var ?PSwag\Example\Application\Dtos\Tag[] $tags */public ?array$tags;
public ?string$status;
}
?>
For $photoUrls the type array is not sufficient. In such cases, its unique datatype can be specified as annotation with /** @var string[] $photoUrls */. Now, PSwag knows how to use it for endpoints. Same applies to $tags, but in addition there is a custom class used as array.
Please note:
When not in the same namespace as Pet, class Tag must be referenced with fully qualified namespace in order to be resolvable by PSwag.
If your model contains data fields that are not meant to be exposed, or inherited classes contain properties that are not sufficient to be converted to an OpenAPI specification, it is considered best practice to create a dedicated dto (data transfer object) class that contains intentional properties only, to use this dto type in API signature instead and to map between your model and this dto type.
Finally, create a Slim application in index.php and register method getPetById to it:
<?phprequire_once"vendor\\autoload.php";
useDI\Container;
usePSwag\PSwagApp;
usePSwag\Example\Application\Services\PetApplicationService;
useSlim\Factory\AppFactory;
AppFactory::setContainer(newContainer()); // if you use dependency injection, PSwag does class loading for you. If you do not use DI, you must ensure to include all dtos explicitly. E.g.: require_once('application/dtos/Pet.php');$slimApp = AppFactory::create();
$app = newPSwagApp($slimApp); // create wrapper PSwagApp$app->addRoutingMiddleware(); // add routing middleware first, otherwise it would try to resolve route before swagger middleware can react$app->addSwaggerUiMiddleware('/swagger', 'PSwag example', '1.0.0', 'vendor/swagger-api/swagger-ui/dist/'); // add swagger middleware: specify url pattern under which swagger UI shall be accessibile, and provide relative path to swagger ui dist.// register endpoints by specifying class and method name$app->get('/pet/{petId}', [PetApplicationService::class, 'getPetById']);
$app->delete('/pet/{petId}', [PetApplicationService::class, 'deletePetById']);
$app->post('/pet', [PetApplicationService::class, 'createNewPet']);
$app->put('/pet', [PetApplicationService::class, 'updatePetById']);
$app->redirect('', './index.php/swagger'); // redirect root to swagger UI$app->run();
?>
When calling index.php/swagger, this is what we’ll finally get:
Path variables
In above example, path variables are used for GET and DELETE endpoints. When specified, PSwag tries to automatically map path variables to parameters of the target method by searching for the same variable name. When executing the endpoint, the value for this path variable will be passed to the method parameter with that same name. If there isn’t such a parameter, the value will actually be ignored and not passed to the method.
Swagger UI shows dedicated input fields for path variables. Because original data fields (query params or dto properties) would be duplicated with parameter mapping mentioned above, PSwag removes them from original data fields. Example: Endpoint /pet/{petId} uses value provided for path variable petId as value for method parameter int $petId, and there will be no additional input field for it anymore.
PSwag tries to automatically derive the value type from the method signature (in this example int) and will set it as type for its corresponding path variable.
Tags
Grouping tags for swagger are automatically derived from the path by the first item after a slash. E.g. /pet/{petId} will be grouped by tag pet. However, this tag can be manually overwritten when registering the endpoint to PSwag by specifying it as a third element in the array:
// register endpoint with a custom tag as third parameter of the array$app->get('/pet/{petId}', [PetApplicationService::class, 'getPetById']); // defaults to 'pet'$app->get('/pet/{petId}', [PetApplicationService::class, 'getPetById', 'groupingTag']); // custom tag$app->get('/pet/{petId}', [PetApplicationService::class, 'getPetById', ['groupingTag']]); // can be also an array$app->get('/pet/{petId}', [PetApplicationService::class, 'getPetById', ['groupingTag', 'otherTag']]); // multiple tags$app->get('/pet/{petId}', [PetApplicationService::class, 'getPetById', []]); // no tag
Authentication
To secure your API endpoints, different standards are supported by PSwag out of the box. When used, OpenAPI specification will also include corresponding auth config automatically.
Basic Authentication
To secure an endpoint with BasicAuth, create a Middleware class that extends from BasicAuthMiddleware:
class MyBasicAuthMiddleware extends BasicAuthMiddleware
{
publicfunctionisUserCredentialValid(string$username, string$password): bool {
return$username == "user" && $password == "1234"; // Do your magic here
}
}
Add this middleware to all endpoints that you want to secure. You can now verify on Swagger UI that it works as expected.
Please note: When securing multiple endpoints with the same instance of middleware instead of creating a new instance each, Swagger UI is aware that authentication data does not need to be re-entered for each endpoint.
Bearer Authentication
To secure an endpoint with Bearer, create a Middleware class that extends from BearerAuthMiddleware:
class MyBearerAuthMiddleware extends BearerAuthMiddleware
{
publicfunctiongetBearerFormat(): ?string {
returnnull; // There is no logic connected with it. Can be "JWT", for example.
}
publicfunctionisBearerTokenValid(string$bearerToken): bool {
return$bearerToken == "1234"; // Do your magic here
}
}
Add this middleware to all endpoints that you want to secure. You can now verify on Swagger UI that it works as expected.
Please note: When securing multiple endpoints with the same instance of middleware instead of creating a new instance each, Swagger UI is aware that authentication data does not need to be re-entered for each endpoint.
API Keys
To secure an endpoint with API Keys, create a Middleware class that extends from ApiKeysAuthMiddleware:
class MyApiKeyAuthMiddleware extends ApiKeyAuthMiddleware
{
publicfunctiongetName(): string {
return"X-API-KEY"; // Specifies the name of the cookie / header / query param that will contain the API Key
}
publicfunctiongetIn(): ApiKeyInType {
return ApiKeyInType::Cookie; // Specifies how API Key is sent to the endpoint: Cookie, Header, Query
}
publicfunctionisApiKeyValid(string$apiKey): bool {
return$apiKey == "1234"; // Do your magic here
}
}
Please note that Query is currently not supported as transportation type for API Keys.
Add this middleware to all endpoints that you want to secure. You can now verify on Swagger UI that it works as expected.
Please note: When securing multiple endpoints with the same instance of middleware instead of creating a new instance each, Swagger UI is aware that authentication data does not need to be re-entered for each endpoint.
OAuth 2.0
Not yet supported. Will come with a later version.
OpenID Connect Discovery
Not yet supported. Will come with a later version.
Learn how to setup your local or CI environment to run E2E tests on iOS & Android emulators with Detox. Write E2E tests for a demo application covering best practices and gotchas along the way.
This document contains links to documentation and resources related to each part of the walk through during this presentation.
git clone https://github.com/danecando/JSM-Detox-Testing.git
cd JSMarathon
yarn
Install pods for iOS development
cd ios && pod install &&cd ..
Running
Android
yarn android
iOS
yarn ios
Branches
main – Base demo app without detox or e2e tests
setup – Demo app with detox setup and configured for iOS + Android with initial working test
tests – Demo app with working e2e tests
App Overview
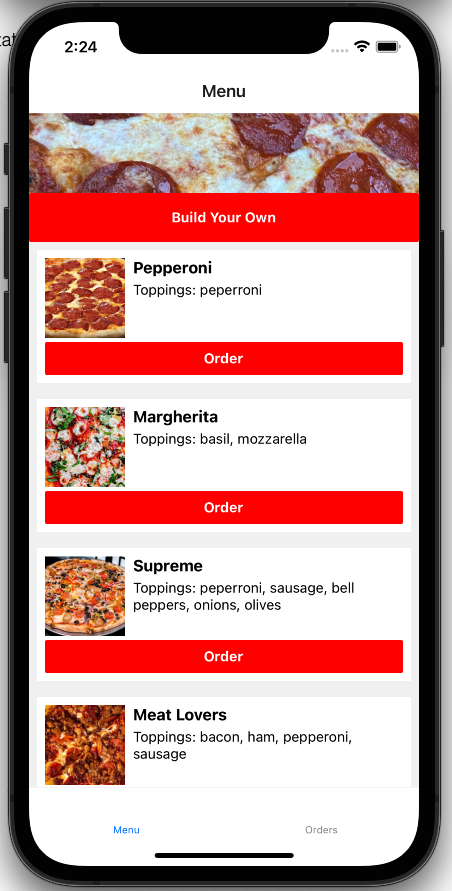
We love pizza at This Dot! The demo is an app for our fictional pizza restaurant.
There are two tabs: Menu and Orders
The menu tab is a list of the available pizzas to order. You can also build your own pizza using the first button at the top of the screen.
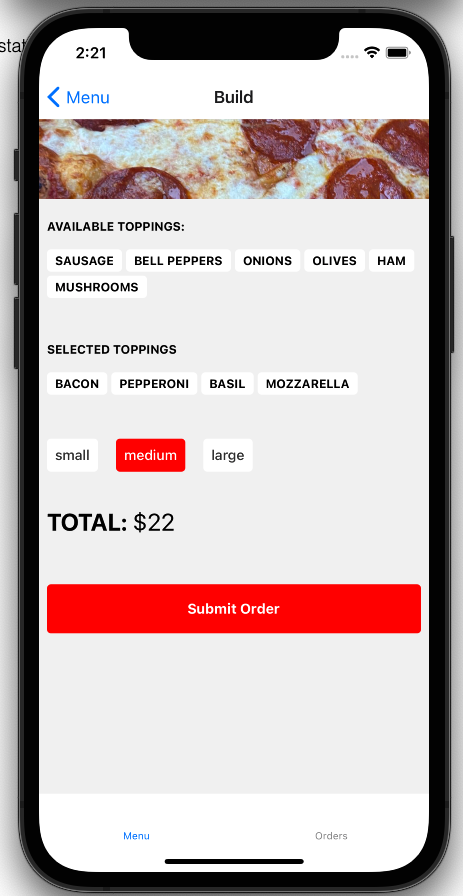
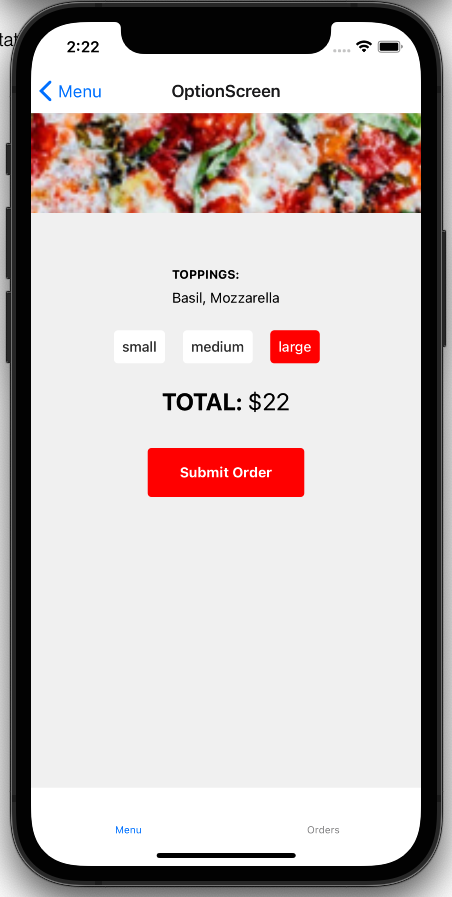
Build your own
On this screen you can add and remove toppings from your pizza, select the size, see the total price, and submit your order.
Menu item options
After selecting an item from the menu list you will be taken to a screen that lets you pick the size and see the final price before submitting your order.
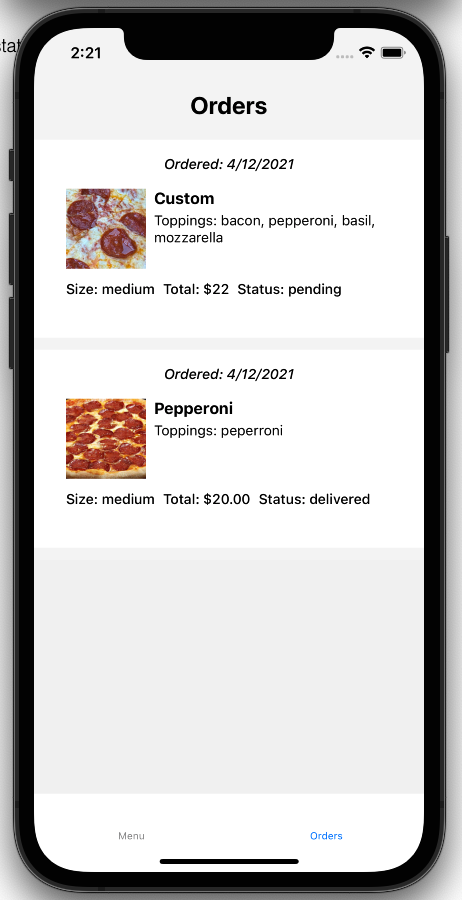
Orders
Orders comes with one previously delivered order populated by default. Any pizzas you create or order will be added to your order screen.
E2E Test Cases
We want to write e2e tests to cover these user flows
User can navigate to orders to see previous orders
User can pick an item from the menu, select a size and options, and place an order
cert-manager manages certificates in Kubernetes environment (among others) and keeps track of renewal requirements (https://cert-manager.io/). It supports various in-built issuers that issue the certificates to be managed by cert-manager.
AWS Private CA Issuer
This project plugs into cert-manager as an external issuer that talks to AWS Certificate Manager Private CA to get certificates issued for your Kubernetes environment.
Clone this repo and perform following steps to install controller:
# make build
# make docker
# make deploy
Create secret that holds AWS credentials:
# cat secret.yaml

apiVersion: v1
kind: Secret
metadata:
  name: aws-credentials
  namespace: awspca-issuer-system
data:
  accesskey: <base64 encoding of AWS access key>
  secretkey: <base64 encoding of AWS secret key>
  region: <base64 encoding of AWS region key>
  arn: <base64 encoding of AWS Private CA ARN>
Note: While generating base64 encoding of above fields, ensure there is no newline character included in the encoded string. For example, following command could be used:
# kubectl apply -f issuer.yaml

# kubectl describe AWSPCAIssuer -n awspca-issuer-system

Name:         awspca-issuer
Namespace:    awspca-issuer-system
Labels:       <none>
Annotations:  API Version:  certmanager.awspca/v1alpha2
Kind:         AWSPCAIssuer
...
Spec:
  Provisioner:
    Accesskey Ref:
      Key:  accesskey
    Arn Ref:
      Key:  arn
    Name:   aws-credentials
    Region Ref:
      Key:  region
    Secretkey Ref:
      Key:  secretkey
Status:
  Conditions:
    Last Transition Time:  2020-08-18T04:34:33Z
    Message:               AWSPCAIssuer verified and ready to sign certificates
    Reason:                Verified
    Status:                True
    Type:                  Ready
Events:
  Type    Reason    Age                    From                     Message
  ----    ------    ----                   ----                     -------
  Normal  Verified  8m22s (x2 over 8m22s)  awspcaissuer-controller  AWSPCAIssuer verified and ready to sign certificates
Now create certificate:
# cat certificate.yaml

apiVersion: cert-manager.io/v1alpha2
kind: Certificate
metadata:
  name: backend-awspca
  namespace: awspca-issuer-system
spec:
  # The secret name to store the signed certificate
  secretName: backend-awspca-tls
  # Common Name
  commonName: foo.com
  # DNS SAN
  dnsNames:
    - localhost
    - foo.com
  # IP Address SAN
  ipAddresses:
    - "127.0.0.1"
  # Duration of the certificate
  duration: 24h
  # Renew 1 hour before the certificate expiration
  renewBefore: 1h
  isCA: false
  # The reference to the step issuer
  issuerRef:
    group: certmanager.awspca
    kind: AWSPCAIssuer
    name: awspca-issuer
# kubectl apply -f certificate.yaml
# kubectl describe Certificate backend-awspca -n awspca-issuer-system

Name:         backend-awspca
Namespace:    awspca-issuer-system
Labels:       <none>
Annotations:  API Version:  cert-manager.io/v1alpha3
Kind:         Certificate
...
Spec:
  Common Name:  foo.com
  Dns Names:
    localhost
    foo.com
  Duration:  24h0m0s
  Ip Addresses:
    127.0.0.1
  Issuer Ref:
    Group:       certmanager.awspca
    Kind:        AWSPCAIssuer
    Name:        awspca-issuer
  Renew Before:  1h0m0s
  Secret Name:   backend-awspca-tls
Status:
  Conditions:
    Last Transition Time:  2020-08-18T04:34:48Z
    Message:               Certificate is up to date and has not expired
    Reason:                Ready
    Status:                True
    Type:                  Ready
  Not After:               2020-08-19T04:34:45Z
  Not Before:              2020-08-18T03:34:45Z
  Renewal Time:            2020-08-19T03:34:45Z
  Revision:                1
Events:
  Type    Reason     Age    From          Message
  ----    ------     ----   ----          -------
  Normal  Issuing    6m1s   cert-manager  Issuing certificate as Secret does not exist
  Normal  Generated  6m     cert-manager  Stored new private key in temporary Secret resource "backend-awspca-7m9sx"
  Normal  Requested  6m     cert-manager  Created new CertificateRequest resource "backend-awspca-m2gz5"
  Normal  Issuing    5m51s  cert-manager  The certificate has been successfully issued
Check certificate and private key are present in secrets:
We underwent naming transition (of github repo, pip package name, and python package name), which will be followed by new functionality. More updates to follow.
Kamene is included in the Network Security Toolkit Release 28. It used to be included in NST since Release 22 under former name.
History
This is a fork of scapy (http://www.secdev.org) originally developed to implement python3 compatibility. It has been used in production on python3 since 2015 (while secdev/scapy implemented python3 compatibility in 2018). The fork was renamed to kamene in 2018 to reduce any confusion.
These features were first implemented in kamene and some of them might have been reimplemented in scapy by now:
replaced PyCrypto with cryptography.io (thanks to @ThomasFaivre)
Windows support without a need for libdnet
option to return Networkx graphs instead of image, e.g. for conversations
replaced gnuplot with Matplotlib
Reading PCAP Next Generation (PCAPNG) files (please, add issues on GitHub for block types and options, which need support. Currently, reading packets only from Enhanced Packet Block)
new command tdecode to call tshark decoding on one packet and display results, this is handy for interactive work and debugging
python3 support
Installation
Install with python3 setup.py install from source tree (get it with git clone https://github.com/phaethon/kamene.git) or pip3 install kamene for latest published version.
On all OS except Linux libpcap should be installed for sending and receiving packets (not python modules – just C libraries) or winpcap driver on Windows. On some OS and configurations installing libdnet may improve experience (for MacOS: brew install libdnet). On Windows libdnet is not required. On some less common configurations netifaces may improve experience.
Usage
Use bytes() (not str()) when converting packet to bytes. Most arguments expect bytes value instead of str value except the ones, which are naturally suited for human input (e.g. domain name).*
You can use kamene running kamene command or by importing kamene as library from interactive python shell (python or ipython) or code.
Simple example that you can try from interactive shell:
fromkamene.allimport*p=IP(dst='www.somesite.ex') /TCP(dport=80) /Raw(b'Some raw bytes')
# to see packet content as bytes use bytes(p) not str(p)sr1(p)
Notice 'www.somesite.ex' as a string, and b'Some raw bytes' as bytes. Domain name is normal human input, thus it is string, raw packet content is byte data. Once you start using, it will seem easier than it looks.
Use ls() to list all supported layers. Use lsc() to list all commands.
Currently, works on Linux, Darwin, Unix and co. Using python 3.4+ on Ubuntu, MacOS, FreeBSD, Windows 10 for testing.
rdpcap reads whole pcap file into memory. If you need to process huge file and perform some operation per packet or calculate some statistics, you can use PcapReader with iterator interface.
withPcapReader('filename.pcap') aspcap_reader:
forpktinpcap_reader:
#do something with the packet
This module is not official, developed, supported or endorsed by iolo AG or
myStrom AG. For questions and other inquiries, use the issue tracker in this
repository please.
Without the support of iolo AG and myStrom AG it would have taken much longer
to create this module which is the base for the integration into Home Assistant. Both companies have provided
and are still providing hardware, valuable feedback and advice. Their
continuous support make further development of this module possible.
This module is at the moment limited to consuming sensor data, device details,
device configurations and states.
The front LED can be controlled but buttons requires you to programm them by
yourself.
d=Dingz("ip_address_or_host")
# Fetch config, this has to be done once to fetch all details about the shades/dimmersawaitd.get_devices_config()
# Fetch the current state of the lights/versawaitd.get_state()
# Get details about shadeshade_0=d.shades.get(0)
print("Blinds: %s Lamella: %s"% (shade_0.current_blind_level(), shade_0.current_lamella_level()))
# Operate shadeshade_0.shade_down()
# Turn on lightd.dimmers.get(2).turn_on(brightness_pct=70)
CLI usage
The package contains a command-line tool which support some basic tasks.
$ dingz discover
License
python-dingz is licensed under ASL 2.0, for more details check LICENSE.
WordPress plugin that checks the password a user enters on registration, reset or profile update to see if it’s been ‘burned’ ( released in a public database breach of another website or obtained through other means and made public ) using Have I Been Pwned’s PwnedPasswords API.
Breakdown
A user enters a password to login, reset or change their password – which triggers the following WordPress hooks: 'user_profile_update_errors', 'registration_errors' or 'validate_password_reset'
The plugin checks for a transient_key to see if a request is already in progress to the Have I Been Pwned API (which limits 1 request every 1.5 seconds from a single IP)
If there’s already a request in progress, the plugin waits 2 seconds and tries again.
Upon the second try, the plugin returns false and logs an error to the error_log. The user will be allowed to set the password they entered, and the password will not have been checked.
If there is not another request in progress the plugin starts a request and sets a transient_key to prevent other requests occurring in the meantime.
The password the user entered is hashed using SHA1. Then the first five characters hash are sent to Have I Been Pwned?, in a technique referred to as k-anonymization.
As an example, the word password when hashed, is 5BAA61E4C9B93F3F0682250B6CF8331B7EE68FD8
In other words, the password is converted to a form that’s hard to reverse
Then it’s trimmed down to the first five characters: 5BAA6
And is sent to Have I Been Pwned? to check their comprehensive database.
Have I Been Pwned? responds with a list of passwords with the same first characters and PwnedPasswordChecker then looks at the list to see if the password is there.
If the password is found in the list an error message is shown to the user and they are informed that the password has been breached:
That password is not secure.
If you use it on other sites,
you should change it immediately
Please enter a different password. Learn more
Installation
Download and place in a new folder within the /wp-content/plugins directory
Activate via wp-admin, drink lemonade.
Todos
Get a few people to double-check my code and call me names.
Possibly find a better method of returning an issue to the user if Have I Been Pwned cannot be reached or limits are met.
Allow for checking of burned passwords completely locally without an external GET request. Wouldn’t be great for plugin-download-size though and would require a more manual install process. – Should probably use CURL instead of file_get_contents, although the latter is more likely to be available on shared hosting. – Replace the switch method with something else for the sake of replacing the switch method with something else.
Cautions
This obviously isn’t perfect. Too many requests or a server outage will return false and allow the user to set the password even if it’s burned. This plugin should be used alongside a strong password policy as a second line of defence.
In the event that Have I Been Pwned were ever itself, pwned – this plugin could end up sending requests to an unwanted recipient. I have taken some precautions to verify that the request is going to the right place, by communicating with the API over a secure connection and limiting what Certificate Authorities are accepted when verifying the domain name, but all these precautions don’t help if the right place is itself compromised. I’d recommend following HIBP on social media so you’ll be able to act if it ever happens.
Also, as much as the k-anonymity model, is a nifty way of limiting what’s being sent to external servers – it’s more or less security through obscurity. Narrowing down which password is yours on a list of similar passwords may be easier than you think. Even though the passwords on Have I Been Pwned are hashed, it’s important to note that the SHA1 algorithm was cracked by Google in early 2017.
Now that you’ve read this, you may as well go download WordFence instead given that it does what this plugin does, isn’t coded by a dingus and has other WordPress-hardening features included to make your site a fortress, or something.
Automated Invoice Generation System Using VBA in Excel
In an effort to enhance efficiency and accuracy in the invoicing process, I developed a fully automated invoice generation system using Visual Basic for Applications (VBA) within Microsoft Excel. This project was pivotal in streamlining the invoicing workflow, significantly reducing the time and effort required for manual data entry, and ensuring the precision of financial transactions.
Project Overview:
Problem Identification: The existing invoicing process was highly manual, involving repetitive data entry, which led to frequent errors and delays. With over 500 invoices generated each month, it became imperative to find a solution that could minimize these inefficiencies and reduce the error rate.
System Design and Development:
Utilizing VBA, I programmed an automated system that could generate invoices with just a few clicks. The system was designed to pull data from multiple sources, such as customer databases, product lists, and pricing tables, ensuring that all necessary information was accurately incorporated into each invoice. The VBA code was structured to handle complex logic, including tax calculations, discounts, and payment terms, all of which were automatically applied based on predefined rules.
Data Integration:
A key feature of the system was its ability to integrate real-time data from various sources. I linked Excel to external databases and other worksheets, allowing the system to update invoice details automatically whenever the source data changed. This integration not only saved time but also ensured that invoices were always generated with the most up-to-date information, enhancing the overall reliability of the invoicing process.
Error Reduction and Efficiency Gains:
By automating the invoicing process, the system reduced manual entry errors by an impressive 90%. The automation also cut down the time required to generate invoices by more than 50%, freeing up valuable time for the finance team to focus on higher-value tasks. Additionally, the system included error-checking mechanisms, such as data validation and conditional formatting, to flag any inconsistencies before the invoices were finalized.
Scalability and Customization:
The VBA-based system was designed with scalability in mind, capable of handling increasing volumes of invoices as the business grew. I also incorporated customizable templates, allowing the finance team to easily adjust the invoice format to meet specific client requirements or comply with different regulatory standards.
Results:
The implementation of the automated invoice generation system resulted in a more efficient and accurate invoicing process. The system’s ability to handle over 100 invoices per month with minimal manual intervention led to a significant reduction in processing time and errors, ultimately improving the company’s cash flow management and customer satisfaction.