Author: ml7py4pj0c7p

  • JSM-Detox

    React Native E2E Testing with Detox

    Learn how to setup your local or CI environment to run E2E tests on iOS & Android emulators with Detox. Write E2E tests for a demo application covering best practices and gotchas along the way.

    This document contains links to documentation and resources related to each part of the walk through during this presentation.

    Table of contents

    Setup

    git clone https://github.com/danecando/JSM-Detox-Testing.git
    cd JSMarathon
    yarn

    Install pods for iOS development

    cd ios && pod install && cd ..

    Running

    Android

    yarn android
    

    iOS

    yarn ios
    

    Branches

    • main – Base demo app without detox or e2e tests
    • setup – Demo app with detox setup and configured for iOS + Android with initial working test
    • tests – Demo app with working e2e tests

    App Overview

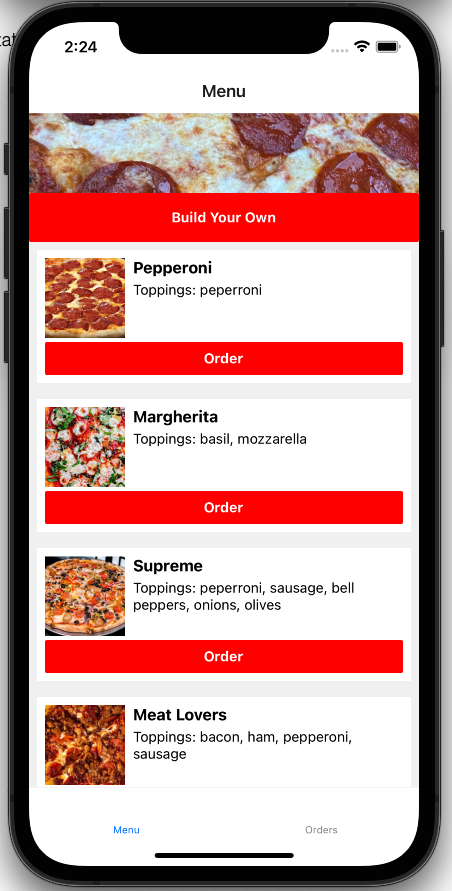
    We love pizza at This Dot! The demo is an app for our fictional pizza restaurant.

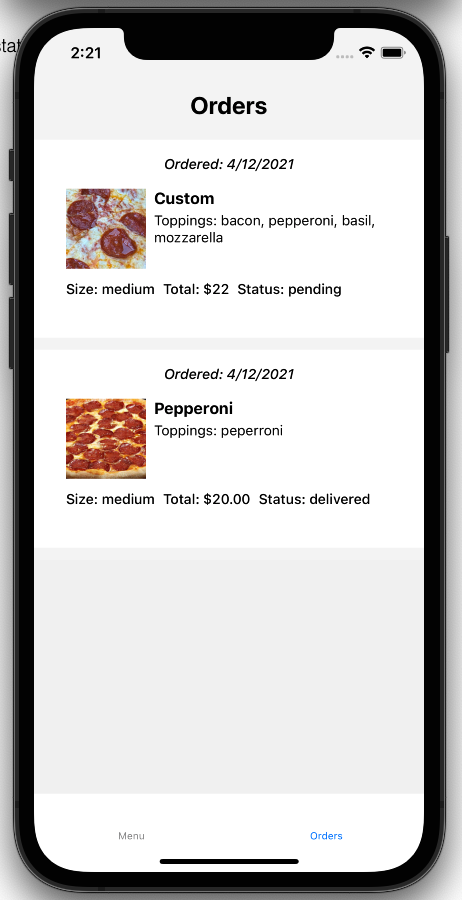
    There are two tabs: Menu and Orders

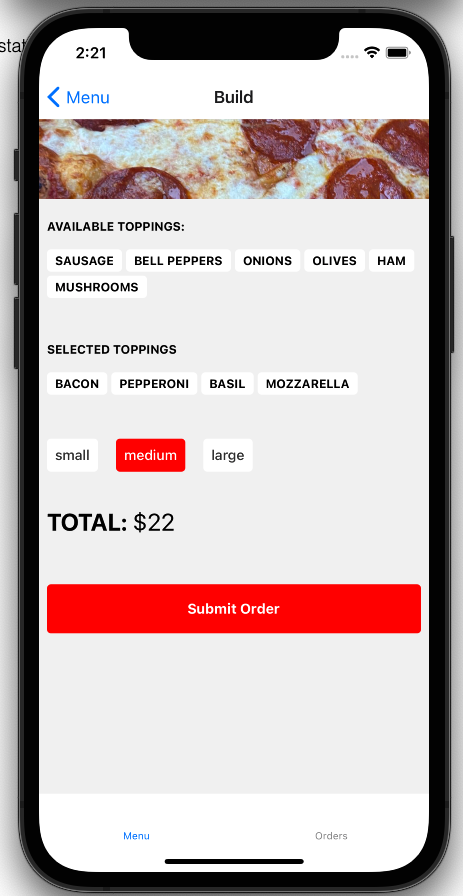
    The menu tab is a list of the available pizzas to order. You can also build your own pizza using the first button at the top of the screen.

    Menu Screen

    Build your own

    On this screen you can add and remove toppings from your pizza, select the size, see the total price, and submit your order.

    Build Screen

    Menu item options

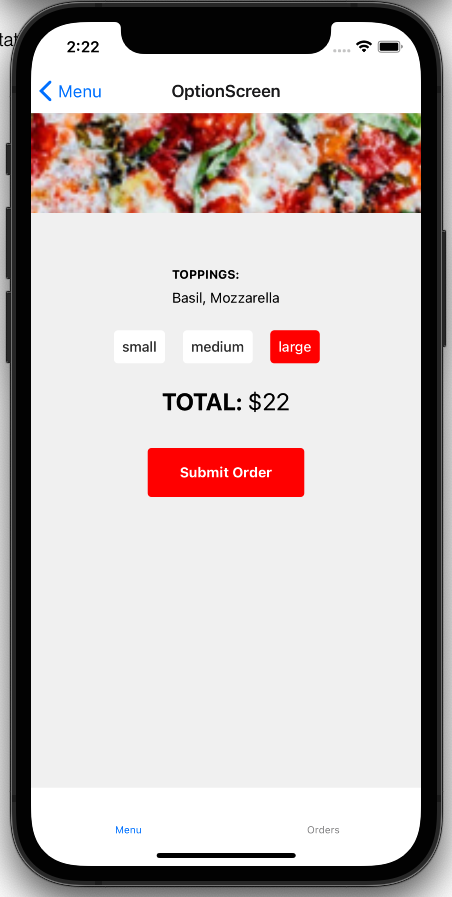
    After selecting an item from the menu list you will be taken to a screen that lets you pick the size and see the final price before submitting your order.

    Options Screen

    Orders

    Orders comes with one previously delivered order populated by default. Any pizzas you create or order will be added to your order screen.

    Orders Screen

    E2E Test Cases

    We want to write e2e tests to cover these user flows

    • User can navigate to orders to see previous orders
    • User can pick an item from the menu, select a size and options, and place an order
    • User can create their own pizza and order it

    Resources

    Visit original content creator repository
  • awspca-issuer

    AWS Certificate Manager Private Certificate Authority

    AWS Certificate Manager Private CA is a Certificate Authority managed by AWS (https://aws.amazon.com/certificate-manager/private-certificate-authority/). It allows creation of root and intermediate CA’s that can issue certificates for entities blessed by the CA.

    cert-manager

    cert-manager manages certificates in Kubernetes environment (among others) and keeps track of renewal requirements (https://cert-manager.io/). It supports various in-built issuers that issue the certificates to be managed by cert-manager.

    AWS Private CA Issuer

    This project plugs into cert-manager as an external issuer that talks to AWS Certificate Manager Private CA to get certificates issued for your Kubernetes environment.

    Setup

    Install cert-manager first (https://cert-manager.io/docs/installation/kubernetes/), version 0.16.1 or later.

    Clone this repo and perform following steps to install controller:

    # make build
    # make docker
    # make deploy
    

    Create secret that holds AWS credentials:

    # cat secret.yaml
    
    apiVersion: v1
    kind: Secret
    metadata:
      name: aws-credentials
      namespace: awspca-issuer-system
    data:
      accesskey: <base64 encoding of AWS access key>
      secretkey: <base64 encoding of AWS secret key>
      region: <base64 encoding of AWS region key>
      arn: <base64 encoding of AWS Private CA ARN>
    

    Note: While generating base64 encoding of above fields, ensure there is no newline character included in the encoded string. For example, following command could be used:

    echo -n "<access key>" | base64
    

    Apply configuration to create secret:

    # kubectl apply -f secret.yaml
    

    Create resource AWSPCAIssuer for our controller:

    # cat issuer.yaml
    
    apiVersion: certmanager.awspca/v1alpha2
    kind: AWSPCAIssuer
    metadata:
      name: awspca-issuer
      namespace: awspca-issuer-system
    spec:
      provisioner:
        name: aws-credentials
        accesskeyRef:
          key: accesskey
        secretkeyRef:
          key: secretkey
        regionRef:
          key: region
        arnRef:
          key: arn
    

    Apply this configuration:

    # kubectl apply -f issuer.yaml
    
    # kubectl describe AWSPCAIssuer -n awspca-issuer-system
    
    Name:         awspca-issuer
    Namespace:    awspca-issuer-system
    Labels:       <none>
    Annotations:  API Version:  certmanager.awspca/v1alpha2
    Kind:         AWSPCAIssuer
    ...
    Spec:
      Provisioner:
        Accesskey Ref:
          Key:  accesskey
        Arn Ref:
          Key:  arn
        Name:   aws-credentials
        Region Ref:
          Key:  region
        Secretkey Ref:
          Key:  secretkey
    Status:
      Conditions:
        Last Transition Time:  2020-08-18T04:34:33Z
        Message:               AWSPCAIssuer verified and ready to sign certificates
        Reason:                Verified
        Status:                True
        Type:                  Ready
    Events:
      Type    Reason    Age                    From                     Message
      ----    ------    ----                   ----                     -------
      Normal  Verified  8m22s (x2 over 8m22s)  awspcaissuer-controller  AWSPCAIssuer verified and ready to sign certificates
    

    Now create certificate:

    # cat certificate.yaml
    
    apiVersion: cert-manager.io/v1alpha2
    kind: Certificate
    metadata:
      name: backend-awspca
      namespace: awspca-issuer-system
    spec:
      # The secret name to store the signed certificate
      secretName: backend-awspca-tls
      # Common Name
      commonName: foo.com
      # DNS SAN
      dnsNames:
        - localhost
        - foo.com
      # IP Address SAN
      ipAddresses:
        - "127.0.0.1"
      # Duration of the certificate
      duration: 24h
      # Renew 1 hour before the certificate expiration
      renewBefore: 1h
      isCA: false
      # The reference to the step issuer
      issuerRef:
        group: certmanager.awspca
        kind: AWSPCAIssuer
        name: awspca-issuer
    

    # kubectl apply -f certificate.yaml
    # kubectl describe Certificate backend-awspca -n awspca-issuer-system
    
    Name:         backend-awspca
    Namespace:    awspca-issuer-system
    Labels:       <none>
    Annotations:  API Version:  cert-manager.io/v1alpha3
    Kind:         Certificate
    ...
    Spec:
      Common Name:  foo.com
      Dns Names:
        localhost
        foo.com
      Duration:  24h0m0s
      Ip Addresses:
        127.0.0.1
      Issuer Ref:
        Group:       certmanager.awspca
        Kind:        AWSPCAIssuer
        Name:        awspca-issuer
      Renew Before:  1h0m0s
      Secret Name:   backend-awspca-tls
    Status:
      Conditions:
        Last Transition Time:  2020-08-18T04:34:48Z
        Message:               Certificate is up to date and has not expired
        Reason:                Ready
        Status:                True
        Type:                  Ready
      Not After:               2020-08-19T04:34:45Z
      Not Before:              2020-08-18T03:34:45Z
      Renewal Time:            2020-08-19T03:34:45Z
      Revision:                1
    Events:
      Type    Reason     Age    From          Message
      ----    ------     ----   ----          -------
      Normal  Issuing    6m1s   cert-manager  Issuing certificate as Secret does not exist
      Normal  Generated  6m     cert-manager  Stored new private key in temporary Secret resource "backend-awspca-7m9sx"
      Normal  Requested  6m     cert-manager  Created new CertificateRequest resource "backend-awspca-m2gz5"
      Normal  Issuing    5m51s  cert-manager  The certificate has been successfully issued
    

    Check certificate and private key are present in secrets:

    # kubectl describe secrets backend-awspca-tls -n awspca-issuer-system   
    
    Name:         backend-awspca-tls
    Namespace:    awspca-issuer-system
    Labels:       <none>
    Annotations:  cert-manager.io/alt-names: localhost,foo.com
                  cert-manager.io/certificate-name: backend-awspca
                  cert-manager.io/common-name: foo.com
                  cert-manager.io/ip-sans: 127.0.0.1
                  cert-manager.io/issuer-kind: AWSPCAIssuer
                  cert-manager.io/issuer-name: awspca-issuer
                  cert-manager.io/uri-sans:
    
    Type:  kubernetes.io/tls
    
    Data
    ====
    tls.key:  xxxx bytes
    tls.crt:  yyyy bytes
    

    Visit original content creator repository

  • kamene

    kamene (formerly known as “scapy for python3” or scapy3k)

    General

    Follow @pkt_kamene for recent news. Original documentation updated for kamene

    News

    We underwent naming transition (of github repo, pip package name, and python package name), which will be followed by new functionality. More updates to follow.

    Kamene is included in the Network Security Toolkit Release 28. It used to be included in NST since Release 22 under former name.

    History

    This is a fork of scapy (http://www.secdev.org) originally developed to implement python3 compatibility. It has been used in production on python3 since 2015 (while secdev/scapy implemented python3 compatibility in 2018). The fork was renamed to kamene in 2018 to reduce any confusion.

    These features were first implemented in kamene and some of them might have been reimplemented in scapy by now:

    • replaced PyCrypto with cryptography.io (thanks to @ThomasFaivre)
    • Windows support without a need for libdnet
    • option to return Networkx graphs instead of image, e.g. for conversations
    • replaced gnuplot with Matplotlib
    • Reading PCAP Next Generation (PCAPNG) files (please, add issues on GitHub for block types and options, which need support. Currently, reading packets only from Enhanced Packet Block)
    • new command tdecode to call tshark decoding on one packet and display results, this is handy for interactive work and debugging
    • python3 support

    Installation

    Install with python3 setup.py install from source tree (get it with git clone https://github.com/phaethon/kamene.git) or pip3 install kamene for latest published version.

    On all OS except Linux libpcap should be installed for sending and receiving packets (not python modules – just C libraries) or winpcap driver on Windows. On some OS and configurations installing libdnet may improve experience (for MacOS: brew install libdnet). On Windows libdnet is not required. On some less common configurations netifaces may improve experience.

    Usage

    Use bytes() (not str()) when converting packet to bytes. Most arguments expect bytes value instead of str value except the ones, which are naturally suited for human input (e.g. domain name).*

    You can use kamene running kamene command or by importing kamene as library from interactive python shell (python or ipython) or code.
    Simple example that you can try from interactive shell:

    from kamene.all import *
    p = IP(dst = 'www.somesite.ex') / TCP(dport = 80) / Raw(b'Some raw bytes')
    # to see packet content as bytes use bytes(p) not str(p)
    sr1(p)

    Notice 'www.somesite.ex' as a string, and b'Some raw bytes' as bytes. Domain name is normal human input, thus it is string, raw packet content is byte data. Once you start using, it will seem easier than it looks.

    Use ls() to list all supported layers. Use lsc() to list all commands.

    Currently, works on Linux, Darwin, Unix and co. Using python 3.4+ on Ubuntu, MacOS, FreeBSD, Windows 10 for testing.

    Compatible with scapy-http module

    Reading huge pcap file

    rdpcap reads whole pcap file into memory. If you need to process huge file and perform some operation per packet or calculate some statistics, you can use PcapReader with iterator interface.

    with PcapReader('filename.pcap') as pcap_reader:
      for pkt in pcap_reader:
        #do something with the packet

    Visit original content creator repository

  • python-dingz

    python-dingz

    Python API for interacting with Dingz devices.

    This module is not official, developed, supported or endorsed by iolo AG or
    myStrom AG. For questions and other inquiries, use the issue tracker in this
    repository please.

    Without the support of iolo AG and myStrom AG it would have taken much longer
    to create this module which is the base for the integration into
    Home Assistant. Both companies have provided
    and are still providing hardware, valuable feedback and advice. Their
    continuous support make further development of this module possible.

    See api.dingz.ch for the API details.

    Limitations

    This module is at the moment limited to consuming sensor data, device details,
    device configurations and states.
    The front LED can be controlled but buttons requires you to programm them by
    yourself.

    No support for setting timers and schedules.

    Requirements

    You need to have Python 3 installed.

    • dingz device
    • Network connection
    • Devices connected to your network

    You need to know the IP address of the devices. Please consult your router
    documentation to get this information or use the dingz CLI tool.

    Installation

    The package is available in the Python Package Index .

    $ pip install dingz

    On a Fedora-based system or on a CentOS/RHEL machine which has EPEL enabled.

    $ sudo dnf -y install python3-dingz

    For Nix or NixOS users is a package available. Keep in mind that the lastest releases might only
    be present in the unstable channel.

    $ nix-env -iA nixos.python3Packages.dingz

    Module usage

    Every unit has its own web interface: http://IP_ADDRESS .

    See example.py for detail about module.

    How to operate shades / dimmers

    d = Dingz("ip_address_or_host")
    # Fetch config, this has to be done once to fetch all details about the shades/dimmers
    await d.get_devices_config()
    
    # Fetch the current state of the lights/vers
    await d.get_state()
    
    # Get details about shade
    shade_0 = d.shades.get(0)
    print("Blinds: %s Lamella: %s" % (shade_0.current_blind_level(), shade_0.current_lamella_level()))
    
    # Operate shade
    shade_0.shade_down()
    
    # Turn on light
    d.dimmers.get(2).turn_on(brightness_pct=70)

    CLI usage

    The package contains a command-line tool which support some basic tasks.

    $ dingz discover

    License

    python-dingz is licensed under ASL 2.0, for more details check LICENSE.

    Visit original content creator repository

  • PwnedPasswordChecker

    Pwned Password Checker

    Updated 3rd March, 2018 GMT +11

    WordPress plugin that checks the password a user enters on registration, reset or profile update to see if it’s been ‘burned’ ( released in a public database breach of another website or obtained through other means and made public ) using Have I Been Pwned’s PwnedPasswords API.

    Breakdown

    1. A user enters a password to login, reset or change their password – which triggers the following WordPress hooks: 'user_profile_update_errors', 'registration_errors' or 'validate_password_reset'
    2. The plugin checks for a transient_key to see if a request is already in progress to the Have I Been Pwned API (which limits 1 request every 1.5 seconds from a single IP)
      • If there’s already a request in progress, the plugin waits 2 seconds and tries again.
      • Upon the second try, the plugin returns false and logs an error to the error_log. The user will be allowed to set the password they entered, and the password will not have been checked.
      • If there is not another request in progress the plugin starts a request and sets a transient_key to prevent other requests occurring in the meantime.
    3. The password the user entered is hashed using SHA1. Then the first five characters hash are sent to Have I Been Pwned?, in a technique referred to as k-anonymization.
      • As an example, the word password when hashed, is 5BAA61E4C9B93F3F0682250B6CF8331B7EE68FD8
      • In other words, the password is converted to a form that’s hard to reverse
      • Then it’s trimmed down to the first five characters: 5BAA6
      • And is sent to Have I Been Pwned? to check their comprehensive database.
    4. Have I Been Pwned? responds with a list of passwords with the same first characters and PwnedPasswordChecker then looks at the list to see if the password is there.
    5. If the password is found in the list an error message is shown to the user and they are informed that the password has been breached:

    That password is not secure.
    If you use it on other sites,
    you should change it immediately
    Please enter a different password.
    Learn more

    Installation

    • Download and place in a new folder within the /wp-content/plugins directory
    • Activate via wp-admin, drink lemonade.

    Todos

    • Get a few people to double-check my code and call me names.
    • Possibly find a better method of returning an issue to the user if Have I Been Pwned cannot be reached or limits are met.
    • Allow for checking of burned passwords completely locally without an external GET request. Wouldn’t be great for plugin-download-size though and would require a more manual install process.
      – Should probably use CURL instead of file_get_contents, although the latter is more likely to be available on shared hosting.
      – Replace the switch method with something else for the sake of replacing the switch method with something else.

    Cautions

    This obviously isn’t perfect. Too many requests or a server outage will return false and allow the user to set the password even if it’s burned. This plugin should be used alongside a strong password policy as a second line of defence.

    In the event that Have I Been Pwned were ever itself, pwned – this plugin could end up sending requests to an unwanted recipient. I have taken some precautions to verify that the request is going to the right place, by communicating with the API over a secure connection and limiting what Certificate Authorities are accepted when verifying the domain name, but all these precautions don’t help if the right place is itself compromised. I’d recommend following HIBP on social media so you’ll be able to act if it ever happens.

    Also, as much as the k-anonymity model, is a nifty way of limiting what’s being sent to external servers – it’s more or less security through obscurity. Narrowing down which password is yours on a list of similar passwords may be easier than you think. Even though the passwords on Have I Been Pwned are hashed, it’s important to note that the SHA1 algorithm was cracked by Google in early 2017.

    Thanks to

    Now that you’ve read this, you may as well go download WordFence instead given that it does what this plugin does, isn’t coded by a dingus and has other WordPress-hardening features included to make your site a fortress, or something.

    Visit original content creator repository

  • Automated-Invoice-System—VBA

    Automated-Invoice-System—VBA

    Automated Invoice Generation System Using VBA in Excel

    In an effort to enhance efficiency and accuracy in the invoicing process, I developed a fully automated invoice generation system using Visual Basic for Applications (VBA) within Microsoft Excel. This project was pivotal in streamlining the invoicing workflow, significantly reducing the time and effort required for manual data entry, and ensuring the precision of financial transactions.

    Project Overview:

    Problem Identification: The existing invoicing process was highly manual, involving repetitive data entry, which led to frequent errors and delays. With over 500 invoices generated each month, it became imperative to find a solution that could minimize these inefficiencies and reduce the error rate.

    System Design and Development:

    Utilizing VBA, I programmed an automated system that could generate invoices with just a few clicks. The system was designed to pull data from multiple sources, such as customer databases, product lists, and pricing tables, ensuring that all necessary information was accurately incorporated into each invoice. The VBA code was structured to handle complex logic, including tax calculations, discounts, and payment terms, all of which were automatically applied based on predefined rules.

    Data Integration:

    A key feature of the system was its ability to integrate real-time data from various sources. I linked Excel to external databases and other worksheets, allowing the system to update invoice details automatically whenever the source data changed. This integration not only saved time but also ensured that invoices were always generated with the most up-to-date information, enhancing the overall reliability of the invoicing process.

    Error Reduction and Efficiency Gains:

    By automating the invoicing process, the system reduced manual entry errors by an impressive 90%. The automation also cut down the time required to generate invoices by more than 50%, freeing up valuable time for the finance team to focus on higher-value tasks. Additionally, the system included error-checking mechanisms, such as data validation and conditional formatting, to flag any inconsistencies before the invoices were finalized.

    Scalability and Customization:

    The VBA-based system was designed with scalability in mind, capable of handling increasing volumes of invoices as the business grew. I also incorporated customizable templates, allowing the finance team to easily adjust the invoice format to meet specific client requirements or comply with different regulatory standards.

    Results:

    The implementation of the automated invoice generation system resulted in a more efficient and accurate invoicing process. The system’s ability to handle over 100 invoices per month with minimal manual intervention led to a significant reduction in processing time and errors, ultimately improving the company’s cash flow management and customer satisfaction.

    Visit original content creator repository

  • vault-express

    vault-express project – ALPHA stage

    A simply secure sign-up/sign-in implementation for web app. You may consider this as runnable guideline for your implementation.

    LIVE DEMO

    Gitter Chat

    This project demonstrates the secure web app by using 3 public web pages and 1 protected user profile page

    Public pages

    • /landing
    • /signup
    • /signin

    Protected page

    • /secure/profile

    Why?

    After I went through for many programming tutorials, I thought It was time to create some web app myself.

    The first thing in my head was “What should I create?” (the big question in my life) and then the next question was “Which framework should I use for frontend, backend and database?” and then again and again many questions pop into.

    But a big common question for most web application that is “How can I secure the content inside my app?”

    Sound easy at first for newbie as me, just create a page for sign-in. BUT the truth never be easy like that.

    I did search for this topic and found scattered information spreads all over internet. Those infomation will give me wrinkles, I don’t want to be an expert on this topic, I just want to create an app with acceptable secure.

    Then I create this project with hope that opensource community will help me out, as always. and also to help people with the same situation as me to solve this issue.

    Features

    • A secure Sign-up/Sign-in implementation
    • Validate input on Client side
    • Validate input on Server side
    • Detect && Protect abnormal usage ???
    • Security logging
    • Detect/Protect DoS attack ???
    • Protect Cross-site Scripting (XSS)
    • Protect SQL injection
    • EU’s General Data Protection Regulation Compliance ??? (trying to achieve)

    Getting Started

    These instructions will get you a copy of the project up and running on your local machine for development and testing purposes. See deployment for notes on how to deploy the project on a live system.

    Prerequisites

    If you just want to check this project out, you don’t need anything special; just Git, npm and Node.js.

    Anyway, if you want to see how we implement DB-tier, You gonna need to install PostgreSQL or MongoDB. Check Deployment for more info

    Installing

    git clone https://github.com/VaultExpress/vault-express.git
    
    cd vault-express
    
    npm install
    

    We use .env file for setting environment variables which you can see what we use in .env-example For quick start you may

    cp .env-example .env
    

    and then you can start the server by

    npm start
    

    Running the tests

    npm test
    

    Deployment

    Coming soon…

    Built With

    • Express.js – Fast, unopinionated, minimalist web framework for Node.js
    • Helmet – Helmet helps you secure your Express apps by setting various HTTP headers
    • Passport – Simple, unobtrusive authentication for Node.js

    Contributing

    Please read CONTRIBUTING.md for details on our code of conduct, and the process for submitting pull requests to us.

    Versioning

    We use SemVer for versioning. For the versions available, see the tags on this repository.

    Contributors

    See also the list of contributors who participated in this project.

    License

    This project is licensed under the MIT License – see the LICENSE file for details

    Acknowledgments

    Visit original content creator repository
  • internet_time

    Internet Time Calculator 2.0

    This C program calculates Swatch Internet Time, a revolutionary concept that could have changed how people measure time. <insert sarcasm flag here> In this alternate reality where Internet Time became the global standard, this tool would be essential for daily time management!

    Internet Time divides the day into 1000 ‘beats’, abolishing time zones and providing a universal time for everyone.

    Features

    • Real-time Beat Calculation: Current beat (@) based on Internet Time
    • Advanced Time Conversion: Convert beats back to standard time
    • Multiple Output Formats: Customizable display formats
    • Timezone Support: Handle different timezone offsets (-12 to +14 hours)
    • Watch Mode: Continuous real-time updates
    • Verbose Mode: Detailed time information and context
    • Internet Date Display: Show dates in Internet Time format
    • Local Time Support: Use system local time instead of UTC
    • Portable & Lightweight: Minimal dependencies, runs everywhere
    • Perfect Integration: Works seamlessly with tmux, status bars, and scripts

    Installation

    Prerequisites

    • C compiler (GCC, Clang, or similar)
    • Make (optional, for easier building)

    Quick Build

    git clone <repository-url>
    cd internet_time
    make

    Development Build (with debug symbols)

    make debug

    System Installation

    make install         # Install to /usr/local/bin (requires sudo)
    # or
    PREFIX=$HOME/.local make install  # Install to user directory

    Usage

    Basic Usage

    # Current Internet Time
    ./internet_time
    # Output: @347.22
    
    # With timezone offset (+3 hours)
    ./internet_time -t 3
    # Output: @472.45
    
    # Using local time
    ./internet_time -l
    # Output: @123.78

    Advanced Features

    # Convert beats to standard time
    ./internet_time -b 500
    # Output: @500.00 = 12:00:00 BMT (Biel Mean Time)
    
    # Verbose output with details
    ./internet_time -v
    # Output: Detailed time breakdown with context
    
    # Show Internet date
    ./internet_time -d
    # Output: Internet Date: 2024.215 (Year 2024, Day 215)
    
    # Watch mode (updates every second)
    ./internet_time -w
    # Output: Continuous real-time updates
    
    # Custom format (zero-padded integer)
    ./internet_time -f '@%04.0f'
    # Output: @0347

    Practical Examples

    # Status bar integration
    ./internet_time -f '%04.0f'  # Clean format for bars
    
    # Time zone conversion
    ./internet_time -t -5        # Eastern Standard Time
    ./internet_time -t 9         # Japan Standard Time
    
    # Business meeting scheduler
    ./internet_time -v           # Get full context for scheduling

    Command Line Options

    Option Description Example
    -t <offset> Timezone offset in hours (-12 to +14) -t 2
    -f <format> Custom output format -f '@%04.0f'
    -l Use local time instead of UTC -l
    -b <beats> Convert beats to standard time -b 500
    -d Show Internet date format -d
    -v Verbose output with details -v
    -w Watch mode (continuous updates) -w
    -h Show help -h

    Format Specifiers

    • %f – Float beats (e.g., 347.22)
    • %d – Integer beats (e.g., 347)
    • %3d – Padded integer beats (e.g., 347)
    • %04d – Zero-padded integer beats (e.g., 0347)

    Integration Examples

    tmux Status Bar

    Add to your .tmux.conf:

    set-option -ag status-right ' #[fg=cyan,bg=default]@#(internet_time -f "%.0f")'

    Bash Prompt

    Add to your .bashrc:

    export PS1='[\u@\h \W @$(internet_time -f "%.0f")] \$ '

    Shell Script Integration

    #!/bin/bash
    current_beat=$(internet_time -f "%.0f")
    if [ $current_beat -lt 500 ]; then
        echo "Good morning! It's @$current_beat"
    else
        echo "Good evening! It's @$current_beat"
    fi

    About Internet Time

    In this alternate reality where Internet Time became the global standard:

    • No Time Zones: Universal time for all
    • 1000 Beats per Day: Each beat = 1 minute 26.4 seconds
    • BMT Reference: Biel Mean Time (UTC+1) as the base
    • Beat Periods:
      • 0-249: Morning beats
      • 250-499: Afternoon beats
      • 500-749: Evening beats
      • 750-999: Night beats

    Development

    Building & Testing

    make clean && make    # Clean build
    make test            # Run basic tests
    make debug           # Debug version
    make format          # Format code

    Contributing

    1. Fork the repository
    2. Create a feature branch
    3. Make your changes
    4. Test thoroughly
    5. Submit a pull request

    License

    BSD 3-Clause License – see LICENSE file for details.

    Bug Reports

    Report bugs to: crg@crg.eti.br


    In a world where Internet Time ruled supreme, this would be an essential tool!

    Contributing

    Contributions are welcome! Follow these steps to contribute:

    1. Fork the repository.
    2. Create a new branch (git checkout -b feature-branch).
    3. Commit your changes (git commit -m 'Add new feature').
    4. Push to the branch (git push origin feature-branch).
    5. Open a Pull Request.

    License

    This project is licensed under the BSD 3-Clause License. See the LICENSE file for details.

    Visit original content creator repository

  • Enterprise-Scale-for-AVS

    Enterprise-Scale for AVS

    Welcome to the Enterprise Scale for Azure VMware Solution (AVS) repository

    Average time to resolve an issue Percentage of issues still open OpenSSF Scorecard

    Navigation Menu


    User Guide

    To find out more about the Azure landing zones reference implementation, please refer to the documentation on our Wiki

    Enterprise-scale is an architectural approach and a reference implementation that enables effective construction and operationalization of landing zones on Azure, at scale. This approach aligns with the Azure roadmap and the Cloud Adoption Framework for Azure.

    Enterprise-scale for AVS represents the strategic design path and target technical state for an Azure VMware Solution (AVS) deployment. This solution provides an architectural approach and reference implementation to prepare landing zone subscriptions for a scalable Azure VMware Solution (AVS) cluster. For the architectural guidance, check out Enterprise-scale for AVS in Microsoft Docs.

    Golden state platform foundation with AVS Landing Zone highlighted in red

    The enterprise-scale for AVS only talks about with what gets deployed in the specific AVS landing zone subscription highlighted by the red box in the picture above. It is assumed that an appropriate platform foundation is already setup which may or may not be the official ESLZ platform foundation. This means that policies and governance should already be in place or should be setup after this implementation and are not a part of the scope this program. The policies applied to management groups in the hierarchy above the subscription will trickle down to the Enterprise-scale for AVS landing zone subscription.

    This repository contains reference implementation scenarios based on a number of different scenarios. For each scenario, we have included both ARM and Bicep as the deployment languages

    This Repository

    In this repository, you get access to various customer scenarios that can help accelerate the development and deployment of AVS clusters that conform with Enterprise-Scale for AVS best practices and guidelines. Each scenario aims to represent common customer experiences with the goal of accelerating the process of developing and deploying conforming AVS clusters using IaC as well as providing a step-by-step learning experience.

    AVS Greenfield Deployment

    This deployment is best suited to those looking to provision a new AVS Private Cloud, the automation will let you choose and deploy the following:

    • AVS Private Cloud: Choose New or Existing
    • [Optional]: Choose New or Existing virtual network (VNet)
    • [Optional]: Deploy Dashboards and Monitoring
    • [Optional]: Enable Diagnostics and Logging for AVS
    • [Optional]: Enable HCX and SRM
    Greenfield deployment options:
    Azure portal UI Deploy to Azure
    Command line (Bicep/ARM) Powershell/Azure CLI
    Terraform Terraform

    AVS Greenfield Lite Deployment

    This deployment is a lite version of the full AVS Greenfield Deployment and will deploy the following:

    • New AVS Private Cloud – Allows for a custom resource group name and Private Cloud Name
    • or Choose an existing AVS Private Cloud
    • [Optional]: Deploy AVS Monitoring
    • [Optional]: Deploy HCX and SRM
    Greenfield Lite deployment:
    Azure portal UI Deploy to Azure

    Terraform modules for additional deployment scenarios and samples

    We’ve created a number of additional Terraform modules for AVS related deployment activities. Details on these modules can be found in the Terraform readme.

    Automated Architecture Assessment

    If an AVS SDDC was deployed using assests provided in this repository or it pre-existed, in both scenarios, it is possible to assess the architectural quality of the deployment. Refer to following links for additional guidance.

    Converting Bicep templates to ARM templates

    Azure deployment templates are being developed in Bicep. Thus, a script file Build-ARM.ps1 is used to compile the .bicep files to .json so templates can be executed as ARM templates instead of Bicep. This is necessary in any deployment mechanism that communicates with Azure Resource Manager REST API directly.

    Once you execute Build-ARM.ps1 in its current location, it will recursively perform ‘az bicep build’ to all .bicep files to .json files (ARM templates).

    Next Steps

    Next steps, head to Getting Started to review prerequisites and deployment options

    Visit original content creator repository